| [ Web Proxy ] |
| Viewing: https://raw.githubusercontent.com/nicecoding1/ffmpeg-python/master/README.md | [Back] [Original] |
 [ffmpeg-python logo]
## Overview
There are tons of Python FFmpeg wrappers out there but they seem to lack complex filter support. `ffmpeg-python` works well for simple as well as complex signal graphs.
## Quickstart
Flip a video horizontally:
```python
import ffmpeg
stream = ffmpeg.input('input.mp4')
stream = ffmpeg.hflip(stream)
stream = ffmpeg.output(stream, 'output.mp4')
ffmpeg.run(stream)
```
Or if you prefer a fluent interface:
```python
import ffmpeg
(
ffmpeg
.input('input.mp4')
.hflip()
.output('output.mp4')
.run()
)
```
## [API reference](https://kkroening.github.io/ffmpeg-python/)
## Complex filter graphs
FFmpeg is extremely powerful, but its command-line interface gets really complicated rather quickly - especially when working with signal graphs and doing anything more than trivial.
Take for example a signal graph that looks like this:
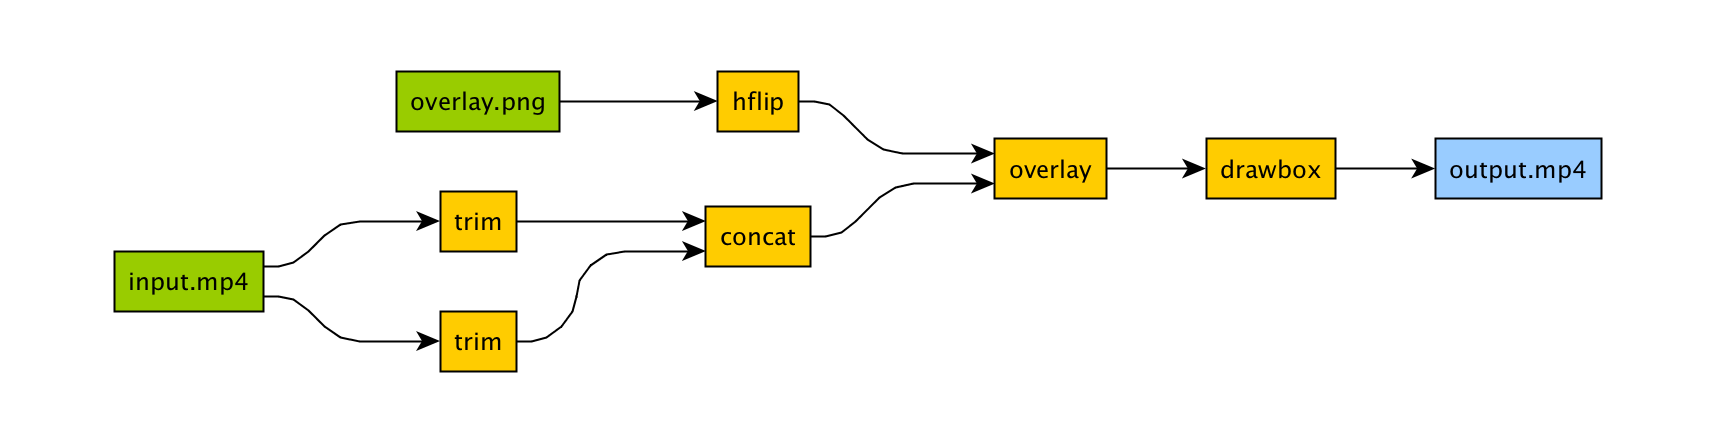
The corresponding command-line arguments are pretty gnarly:
```bash
ffmpeg -i input.mp4 -i overlay.png -filter_complex "[0]trim=start_frame=10:end_frame=20[v0];\
[0]trim=start_frame=30:end_frame=40[v1];[v0][v1]concat=n=2[v2];[1]hflip[v3];\
[v2][v3]overlay=eof_action=repeat[v4];[v4]drawbox=50:50:120:120:red:t=5[v5]"\
-map [v5] output.mp4
```
Maybe this looks great to you, but if you're not an FFmpeg command-line expert, it probably looks alien.
If you're like me and find Python to be powerful and readable, it's easier with `ffmpeg-python`:
```python
import ffmpeg
in_file = ffmpeg.input('input.mp4')
overlay_file = ffmpeg.input('overlay.png')
(
ffmpeg
.concat(
in_file.trim(start_frame=10, end_frame=20),
in_file.trim(start_frame=30, end_frame=40),
)
.overlay(overlay_file.hflip())
.drawbox(50, 50, 120, 120, color='red', thickness=5)
.output('out.mp4')
.run()
)
```
`ffmpeg-python` takes care of running `ffmpeg` with the command-line arguments that correspond to the above filter diagram, in familiar Python terms.
[ffmpeg-python logo]
## Overview
There are tons of Python FFmpeg wrappers out there but they seem to lack complex filter support. `ffmpeg-python` works well for simple as well as complex signal graphs.
## Quickstart
Flip a video horizontally:
```python
import ffmpeg
stream = ffmpeg.input('input.mp4')
stream = ffmpeg.hflip(stream)
stream = ffmpeg.output(stream, 'output.mp4')
ffmpeg.run(stream)
```
Or if you prefer a fluent interface:
```python
import ffmpeg
(
ffmpeg
.input('input.mp4')
.hflip()
.output('output.mp4')
.run()
)
```
## [API reference](https://kkroening.github.io/ffmpeg-python/)
## Complex filter graphs
FFmpeg is extremely powerful, but its command-line interface gets really complicated rather quickly - especially when working with signal graphs and doing anything more than trivial.
Take for example a signal graph that looks like this:

The corresponding command-line arguments are pretty gnarly:
```bash
ffmpeg -i input.mp4 -i overlay.png -filter_complex "[0]trim=start_frame=10:end_frame=20[v0];\
[0]trim=start_frame=30:end_frame=40[v1];[v0][v1]concat=n=2[v2];[1]hflip[v3];\
[v2][v3]overlay=eof_action=repeat[v4];[v4]drawbox=50:50:120:120:red:t=5[v5]"\
-map [v5] output.mp4
```
Maybe this looks great to you, but if you're not an FFmpeg command-line expert, it probably looks alien.
If you're like me and find Python to be powerful and readable, it's easier with `ffmpeg-python`:
```python
import ffmpeg
in_file = ffmpeg.input('input.mp4')
overlay_file = ffmpeg.input('overlay.png')
(
ffmpeg
.concat(
in_file.trim(start_frame=10, end_frame=20),
in_file.trim(start_frame=30, end_frame=40),
)
.overlay(overlay_file.hflip())
.drawbox(50, 50, 120, 120, color='red', thickness=5)
.output('out.mp4')
.run()
)
```
`ffmpeg-python` takes care of running `ffmpeg` with the command-line arguments that correspond to the above filter diagram, in familiar Python terms.
 [Screenshot]
Real-world signal graphs can get a heck of a lot more complex, but `ffmpeg-python` handles arbitrarily large (directed-acyclic) signal graphs.
## Installation
### Installing `ffmpeg-python`
The latest version of `ffmpeg-python` can be acquired via a typical pip install:
```bash
pip install ffmpeg-python
```
Or the source can be cloned and installed from locally:
```bash
git clone git@github.com:kkroening/ffmpeg-python.git
pip install -e ./ffmpeg-python
```
> **Note**: `ffmpeg-python` makes no attempt to download/install FFmpeg, as `ffmpeg-python` is merely a pure-Python wrapper - whereas FFmpeg installation is platform-dependent/environment-specific, and is thus the responsibility of the user, as described below.
### Installing FFmpeg
Before using `ffmpeg-python`, FFmpeg must be installed and accessible via the `$PATH` environment variable.
There are a variety of ways to install FFmpeg, such as the [official download links](https://ffmpeg.org/download.html), or using your package manager of choice (e.g. `sudo apt install ffmpeg` on Debian/Ubuntu, `brew install ffmpeg` on OS X, etc.).
Regardless of how FFmpeg is installed, you can check if your environment path is set correctly by running the `ffmpeg` command from the terminal, in which case the version information should appear, as in the following example (truncated for brevity):
```
$ ffmpeg
ffmpeg version 4.2.4-1ubuntu0.1 Copyright (c) 2000-2020 the FFmpeg developers
built with gcc 9 (Ubuntu 9.3.0-10ubuntu2)
```
> **Note**: The actual version information displayed here may vary from one system to another; but if a message such as `ffmpeg: command not found` appears instead of the version information, FFmpeg is not properly installed.
## [Examples](https://github.com/kkroening/ffmpeg-python/tree/master/examples)
When in doubt, take a look at the [examples](https://github.com/kkroening/ffmpeg-python/tree/master/examples) to see if there's something that's close to whatever you're trying to do.
Here are a few:
- [Convert video to numpy array](https://github.com/kkroening/ffmpeg-python/blob/master/examples/README.md#convert-video-to-numpy-array)
- [Generate thumbnail for video](https://github.com/kkroening/ffmpeg-python/blob/master/examples/README.md#generate-thumbnail-for-video)
- [Read raw PCM audio via pipe](https://github.com/kkroening/ffmpeg-python/blob/master/examples/README.md#convert-sound-to-raw-pcm-audio)
- [JupyterLab/Notebook stream editor](https://github.com/kkroening/ffmpeg-python/blob/master/examples/README.md#jupyter-stream-editor)
[Screenshot]
Real-world signal graphs can get a heck of a lot more complex, but `ffmpeg-python` handles arbitrarily large (directed-acyclic) signal graphs.
## Installation
### Installing `ffmpeg-python`
The latest version of `ffmpeg-python` can be acquired via a typical pip install:
```bash
pip install ffmpeg-python
```
Or the source can be cloned and installed from locally:
```bash
git clone git@github.com:kkroening/ffmpeg-python.git
pip install -e ./ffmpeg-python
```
> **Note**: `ffmpeg-python` makes no attempt to download/install FFmpeg, as `ffmpeg-python` is merely a pure-Python wrapper - whereas FFmpeg installation is platform-dependent/environment-specific, and is thus the responsibility of the user, as described below.
### Installing FFmpeg
Before using `ffmpeg-python`, FFmpeg must be installed and accessible via the `$PATH` environment variable.
There are a variety of ways to install FFmpeg, such as the [official download links](https://ffmpeg.org/download.html), or using your package manager of choice (e.g. `sudo apt install ffmpeg` on Debian/Ubuntu, `brew install ffmpeg` on OS X, etc.).
Regardless of how FFmpeg is installed, you can check if your environment path is set correctly by running the `ffmpeg` command from the terminal, in which case the version information should appear, as in the following example (truncated for brevity):
```
$ ffmpeg
ffmpeg version 4.2.4-1ubuntu0.1 Copyright (c) 2000-2020 the FFmpeg developers
built with gcc 9 (Ubuntu 9.3.0-10ubuntu2)
```
> **Note**: The actual version information displayed here may vary from one system to another; but if a message such as `ffmpeg: command not found` appears instead of the version information, FFmpeg is not properly installed.
## [Examples](https://github.com/kkroening/ffmpeg-python/tree/master/examples)
When in doubt, take a look at the [examples](https://github.com/kkroening/ffmpeg-python/tree/master/examples) to see if there's something that's close to whatever you're trying to do.
Here are a few:
- [Convert video to numpy array](https://github.com/kkroening/ffmpeg-python/blob/master/examples/README.md#convert-video-to-numpy-array)
- [Generate thumbnail for video](https://github.com/kkroening/ffmpeg-python/blob/master/examples/README.md#generate-thumbnail-for-video)
- [Read raw PCM audio via pipe](https://github.com/kkroening/ffmpeg-python/blob/master/examples/README.md#convert-sound-to-raw-pcm-audio)
- [JupyterLab/Notebook stream editor](https://github.com/kkroening/ffmpeg-python/blob/master/examples/README.md#jupyter-stream-editor)
 [jupyter demo]
- [Tensorflow/DeepDream streaming](https://github.com/kkroening/ffmpeg-python/blob/master/examples/README.md#tensorflow-streaming)
[jupyter demo]
- [Tensorflow/DeepDream streaming](https://github.com/kkroening/ffmpeg-python/blob/master/examples/README.md#tensorflow-streaming)
 [deep dream streaming]
See the [Examples README](https://github.com/kkroening/ffmpeg-python/tree/master/examples) for additional examples.
## Custom Filters
Don't see the filter you're looking for? While `ffmpeg-python` includes shorthand notation for some of the most commonly used filters (such as `concat`), all filters can be referenced via the `.filter` operator:
```python
stream = ffmpeg.input('dummy.mp4')
stream = ffmpeg.filter(stream, 'fps', fps=25, round='up')
stream = ffmpeg.output(stream, 'dummy2.mp4')
ffmpeg.run(stream)
```
Or fluently:
```python
(
ffmpeg
.input('dummy.mp4')
.filter('fps', fps=25, round='up')
.output('dummy2.mp4')
.run()
)
```
**Special option names:**
Arguments with special names such as `-qscale:v` (variable bitrate), `-b:v` (constant bitrate), etc. can be specified as a keyword-args dictionary as follows:
```python
(
ffmpeg
.input('in.mp4')
.output('out.mp4', **{'qscale:v': 3})
.run()
)
```
**Multiple inputs:**
Filters that take multiple input streams can be used by passing the input streams as an array to `ffmpeg.filter`:
```python
main = ffmpeg.input('main.mp4')
logo = ffmpeg.input('logo.png')
(
ffmpeg
.filter([main, logo], 'overlay', 10, 10)
.output('out.mp4')
.run()
)
```
**Multiple outputs:**
Filters that produce multiple outputs can be used with `.filter_multi_output`:
```python
split = (
ffmpeg
.input('in.mp4')
.filter_multi_output('split') # or `.split()`
)
(
ffmpeg
.concat(split[0], split[1].reverse())
.output('out.mp4')
.run()
)
```
(In this particular case, `.split()` is the equivalent shorthand, but the general approach works for other multi-output filters)
**String expressions:**
Expressions to be interpreted by ffmpeg can be included as string parameters and reference any special ffmpeg variable names:
```python
(
ffmpeg
.input('in.mp4')
.filter('crop', 'in_w-2*10', 'in_h-2*20')
.input('out.mp4')
)
```
[deep dream streaming]
See the [Examples README](https://github.com/kkroening/ffmpeg-python/tree/master/examples) for additional examples.
## Custom Filters
Don't see the filter you're looking for? While `ffmpeg-python` includes shorthand notation for some of the most commonly used filters (such as `concat`), all filters can be referenced via the `.filter` operator:
```python
stream = ffmpeg.input('dummy.mp4')
stream = ffmpeg.filter(stream, 'fps', fps=25, round='up')
stream = ffmpeg.output(stream, 'dummy2.mp4')
ffmpeg.run(stream)
```
Or fluently:
```python
(
ffmpeg
.input('dummy.mp4')
.filter('fps', fps=25, round='up')
.output('dummy2.mp4')
.run()
)
```
**Special option names:**
Arguments with special names such as `-qscale:v` (variable bitrate), `-b:v` (constant bitrate), etc. can be specified as a keyword-args dictionary as follows:
```python
(
ffmpeg
.input('in.mp4')
.output('out.mp4', **{'qscale:v': 3})
.run()
)
```
**Multiple inputs:**
Filters that take multiple input streams can be used by passing the input streams as an array to `ffmpeg.filter`:
```python
main = ffmpeg.input('main.mp4')
logo = ffmpeg.input('logo.png')
(
ffmpeg
.filter([main, logo], 'overlay', 10, 10)
.output('out.mp4')
.run()
)
```
**Multiple outputs:**
Filters that produce multiple outputs can be used with `.filter_multi_output`:
```python
split = (
ffmpeg
.input('in.mp4')
.filter_multi_output('split') # or `.split()`
)
(
ffmpeg
.concat(split[0], split[1].reverse())
.output('out.mp4')
.run()
)
```
(In this particular case, `.split()` is the equivalent shorthand, but the general approach works for other multi-output filters)
**String expressions:**
Expressions to be interpreted by ffmpeg can be included as string parameters and reference any special ffmpeg variable names:
```python
(
ffmpeg
.input('in.mp4')
.filter('crop', 'in_w-2*10', 'in_h-2*20')
.input('out.mp4')
)
```
 [ffmpeg-python logo]
One of the best things you can do to help make `ffmpeg-python` better is to answer [open questions](https://github.com/kkroening/ffmpeg-python/labels/question) in the issue tracker. The questions that are answered will be tagged and incorporated into the documentation, examples, and other learning resources.
If you notice things that could be better in the documentation or overall development experience, please say so in the [issue tracker](https://github.com/kkroening/ffmpeg-python/issues). And of course, feel free to report any bugs or submit feature requests.
Pull requests are welcome as well, but it wouldn't hurt to touch base in the issue tracker or hop on the [Matrix chat channel](https://riot.im/app/#/room/#ffmpeg-python:matrix.org) first.
Anyone who fixes any of the [open bugs](https://github.com/kkroening/ffmpeg-python/labels/bug) or implements [requested enhancements](https://github.com/kkroening/ffmpeg-python/labels/enhancement) is a hero, but changes should include passing tests.
### Running tests
```bash
git clone git@github.com:kkroening/ffmpeg-python.git
cd ffmpeg-python
virtualenv venv
. venv/bin/activate # (OS X / Linux)
venv\bin\activate # (Windows)
pip install -e .[dev]
pytest
```
[ffmpeg-python logo]
One of the best things you can do to help make `ffmpeg-python` better is to answer [open questions](https://github.com/kkroening/ffmpeg-python/labels/question) in the issue tracker. The questions that are answered will be tagged and incorporated into the documentation, examples, and other learning resources.
If you notice things that could be better in the documentation or overall development experience, please say so in the [issue tracker](https://github.com/kkroening/ffmpeg-python/issues). And of course, feel free to report any bugs or submit feature requests.
Pull requests are welcome as well, but it wouldn't hurt to touch base in the issue tracker or hop on the [Matrix chat channel](https://riot.im/app/#/room/#ffmpeg-python:matrix.org) first.
Anyone who fixes any of the [open bugs](https://github.com/kkroening/ffmpeg-python/labels/bug) or implements [requested enhancements](https://github.com/kkroening/ffmpeg-python/labels/enhancement) is a hero, but changes should include passing tests.
### Running tests
```bash
git clone git@github.com:kkroening/ffmpeg-python.git
cd ffmpeg-python
virtualenv venv
. venv/bin/activate # (OS X / Linux)
venv\bin\activate # (Windows)
pip install -e .[dev]
pytest
```
| Web Proxy Viewer | New URL | Original Page |