Commit c013c05
File renamed without changes.
| Original file line number | Diff line number | Diff line change | |
|---|---|---|---|
@@ -0,0 +1 @@ | |||
| 1 | + <!-- readme --> | ||
| Original file line number | Diff line number | Diff line change | |
|---|---|---|---|
@@ -0,0 +1,56 @@ | |||
| 1 | + ## Step 1: Create your first codespace and push code | ||
| 2 | + | ||
| 3 | + _Welcome to "Develop code using GitHub Codespaces and Visual Studio Code"! :wave:_ | ||
| 4 | + | ||
| 5 | + **What's the big deal about using a codespace for software development?** A codespace is a development environment that's hosted in the cloud. You can customize your project for GitHub Codespaces by committing configuration files to your repository (also known as configuration-as-code), which creates a repeatable codespace configuration for all users of your project. Each codespace you create is hosted by GitHub in a Docker container that runs on a virtual machine. You can choose the type of machine you want to use depending on the resources you need. | ||
| 6 | + | ||
| 7 | + GitHub offers a range of features to help your development team customize a codespace to reach peak configuration and performance needs. For example, you can: | ||
| 8 | + | ||
| 9 | + - Create a codespace from your repository. | ||
| 10 | + - Push code from the codespace to your repository. | ||
| 11 | + - Use VS Code to develop code. | ||
| 12 | + - Customize the codespace with custom images. | ||
| 13 | + - Manage the codespace. | ||
| 14 | + | ||
| 15 | + To begin developing using GitHub Codespaces, you can create a codespace from a template or from any branch or commit in a repository. When you create a codespace from a template, you can start from a blank template or choose a template suitable for the work you're doing. | ||
| 16 | + | ||
| 17 | + ### :keyboard: Activity: Start a codespace | ||
| 18 | + | ||
| 19 | + **We recommend opening another browser tab to work through the following activities so you can keep these instructions open for reference.** | ||
| 20 | + | ||
| 21 | + 1. Start from the landing page of your repository. | ||
| 22 | + 1. Click the green **Code** button located in the middle of the page. | ||
| 23 | + 1. Select the **Codespaces** tab in the box that pops up and then click the **Create codespace on main** button. | ||
| 24 | + | ||
| 25 | + > Wait about 2 minutes for the codespace to spin itself up. | ||
| 26 | + > **Note**: It's a virtual machine spinning up in the background. | ||
| 27 | + | ||
| 28 | + 1. Verify your codespace is running. The browser should contain a VS Code web-based editor and a terminal should be present such as the below: | ||
| 29 | + 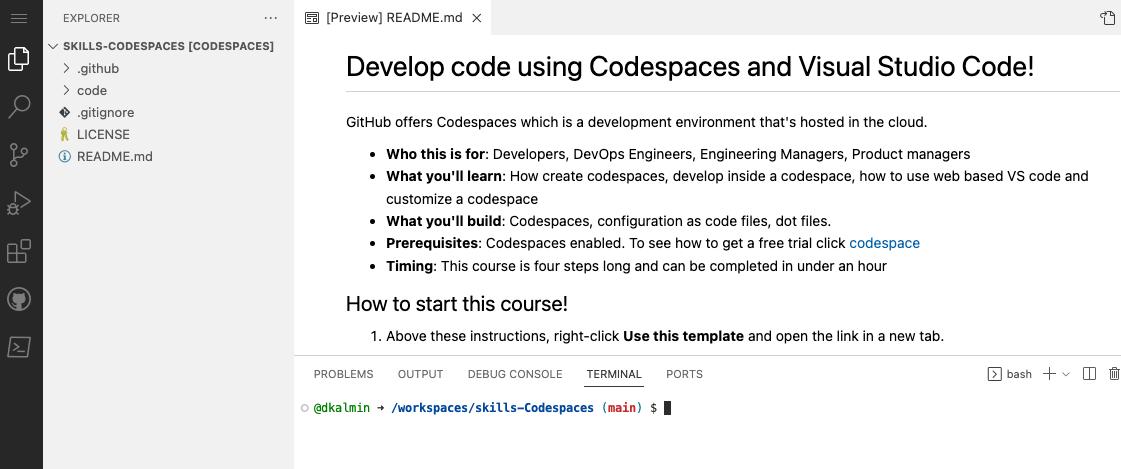 | ||
| 30 | + | ||
| 31 | + ### :keyboard: Activity: Push code to your repository from the codespace | ||
| 32 | + | ||
| 33 | + 1. From inside the codespace in the VS Code explorer window, select the `index.html` file. | ||
| 34 | + 1. Replace the **h1** header with the below: | ||
| 35 | + | ||
| 36 | + ``` | ||
| 37 | + <h1>Hello from the codespace!</h1> | ||
| 38 | + ``` | ||
| 39 | + | ||
| 40 | + 1. Save the file. | ||
| 41 | + > **Note**: The file should autosave. | ||
| 42 | + 1. Use the VS Code terminal to commit the file change by entering the following commit message: | ||
| 43 | + | ||
| 44 | + ``` | ||
| 45 | + git commit -a -m "Adding hello from the codespace!" | ||
| 46 | + ``` | ||
| 47 | + | ||
| 48 | + 1. Push the changes back to your repository. From the VS Code terminal, enter: | ||
| 49 | + | ||
| 50 | + ``` | ||
| 51 | + git push | ||
| 52 | + ``` | ||
| 53 | + | ||
| 54 | + 1. Your code has been pushed to your repository! | ||
| 55 | + 1. Switch back to the homepage of your repository and view the `index.html` to verify the new code was pushed to your repository. | ||
| 56 | + 1. Wait about 20 seconds then refresh this page (the one you're following instructions from). [GitHub Actions](https://docs.github.com/en/actions) will automatically update to the next step. | ||
| Original file line number | Diff line number | Diff line change | |
|---|---|---|---|
@@ -0,0 +1,48 @@ | |||
| 1 | + ## Step 2: Add a custom image to your codespace! | ||
| 2 | + | ||
| 3 | + _Nice work! :tada: You created your first codespace and pushed code using VS Code!_ | ||
| 4 | + | ||
| 5 | + You can configure the development container for a repository so that any codespace created for that repository will give you a tailored development environment, complete with all the tools and runtimes you need to work on a specific project. | ||
| 6 | + | ||
| 7 | + **What are development containers?** Development containers, or dev containers, are Docker containers that are specifically configured to provide a fully featured development environment. Whenever you work in a codespace, you are using a dev container on a virtual machine. | ||
| 8 | + | ||
| 9 | + A dev container file is a JSON file that lets you customize the default image that runs your codespace, VS code settings, run custom code, forward ports and much more! | ||
| 10 | + | ||
| 11 | + Let's add a `devcontainer.json` file and add a custom image. | ||
| 12 | + | ||
| 13 | + ### :keyboard: Activity: Add a .devcontainer.json file to customize your codespace | ||
| 14 | + | ||
| 15 | + 1. Navigating back to your **Code** tab of your repository, click the **Add file** drop-down button, and then click `Create new file`. | ||
| 16 | + 1. Type or paste the following in the empty text field prompt to name your file. | ||
| 17 | + | ||
| 18 | + ``` | ||
| 19 | + .devcontainer/devcontainer.json | ||
| 20 | + ``` | ||
| 21 | + | ||
| 22 | + 1. In the body of the new **.devcontainer/devcontainer.json** file, add the following content: | ||
| 23 | + | ||
| 24 | + ``` | ||
| 25 | + { | ||
| 26 | + // Name this configuration | ||
| 27 | + "name": "Codespace for Skills!", | ||
| 28 | + // Use the base codespace image | ||
| 29 | + "image": "mcr.microsoft.com/vscode/devcontainers/universal:latest", | ||
| 30 | + | ||
| 31 | + "remoteUser": "codespace", | ||
| 32 | + "overrideCommand": false | ||
| 33 | + } | ||
| 34 | + ``` | ||
| 35 | + | ||
| 36 | + 1. Click **Commit changes** and then select **Commit changes directly to the `main` branch**. | ||
| 37 | + 1. Create a new codespace by navigating back to the **Code** tab of your repository. | ||
| 38 | + 1. Click the green **Code** button located in the middle of the page. | ||
| 39 | + 1. Click the **Codespaces** tab on the box that pops up. | ||
| 40 | + 1. Click the **Create codespace on main** button OR click the `+` sign on the tab. This will create a new codespace on the main branch. (Notice your other codespace listed here.) | ||
| 41 | + | ||
| 42 | + > Wait about **2 minutes** for the codespace to spin itself up. | ||
| 43 | + | ||
| 44 | + 1. Verify that your new codespace is is running, as you did previously. | ||
| 45 | + | ||
| 46 | + Note the image being used is the default image provided for GitHub Codespaces. It includes runtimes and tools for Python, Node.js, Docker, and more. See the full list here: https://aka.ms/ghcs-default-image. Your development team can use any custom image that has the necessary prerequisites installed. For more information, see [codespace image](https://aka.ms/configure-codespace). | ||
| 47 | + | ||
| 48 | + 1. Wait about 20 seconds then refresh this page (the one you're following instructions from). [GitHub Actions](https://docs.github.com/en/actions) will automatically update to the next step. | ||
| Original file line number | Diff line number | Diff line change | |
|---|---|---|---|
@@ -0,0 +1,67 @@ | |||
| 1 | + ## Step 3: Customize your codespace! | ||
| 2 | + | ||
| 3 | + _Nice work! :tada: You created a codespace with a custom image!_ | ||
| 4 | + | ||
| 5 | + You can customize your codespace by adding VS code extensions, adding features, setting host requirements, and much more. | ||
| 6 | + | ||
| 7 | + Let's customize some settings in the `.devcontainer.json` file! | ||
| 8 | + | ||
| 9 | + ### :keyboard: Activity: Add customizations to the `devcontainer` file | ||
| 10 | + | ||
| 11 | + 1. Navigate to the `.devcontainer/devcontainer.json` file. | ||
| 12 | + 1. Add the following customizations to the body of the file before the last `}`. | ||
| 13 | + | ||
| 14 | + ``` | ||
| 15 | + , | ||
| 16 | + // Add the IDs of extensions you want installed when the container is created. | ||
| 17 | + "customizations": { | ||
| 18 | + "vscode": { | ||
| 19 | + "extensions": [ | ||
| 20 | + "GitHub.copilot" | ||
| 21 | + ] | ||
| 22 | + }, | ||
| 23 | + "codespaces": { | ||
| 24 | + "openFiles": [ | ||
| 25 | + "codespace.md" | ||
| 26 | + ] | ||
| 27 | + } | ||
| 28 | + } | ||
| 29 | + ``` | ||
| 30 | + | ||
| 31 | + 1. Click **Commit changes** and then select **Commit changes directly to the `main` branch**. | ||
| 32 | + 1. Create a new codespace by navigating to the landing page of your repository. | ||
| 33 | + 1. Click the **Code** button located in the middle of the page. | ||
| 34 | + 1. Click the **Codespaces** tab on the box that pops up. | ||
| 35 | + 1. Click the **Create codespace on main** button. | ||
| 36 | + | ||
| 37 | + > Wait about **2 minutes** for the codespace to spin itself up. | ||
| 38 | + | ||
| 39 | + 1. Verify your codespace is running, as you did previously. | ||
| 40 | + 1. The `codespace.md` file should show up in the VS Code editor. | ||
| 41 | + 1. The `copilot` extension should show up in the VS Code extension list. | ||
| 42 | + | ||
| 43 | + This will add a VS Code extension as well as open a file on start up of the codespace. | ||
| 44 | + | ||
| 45 | + Next lets add some code to run upon creation of the codespace! | ||
| 46 | + | ||
| 47 | + ### :keyboard: Activity: Execute code upon creation of the codespace | ||
| 48 | + | ||
| 49 | + 1. Edit the `.devcontainer/devcontainer.json` file. | ||
| 50 | + 1. Add the following postCreateCommand to the body of the file before the last `}`. | ||
| 51 | + | ||
| 52 | + ``` | ||
| 53 | + , | ||
| 54 | + "postCreateCommand": "echo '# Writing code upon codespace creation!' >> codespace.md" | ||
| 55 | + ``` | ||
| 56 | + | ||
| 57 | + 1. Click **Commit changes** and then select **Commit changes directly to the `main` branch**. | ||
| 58 | + 1. Create a new codespace by navigating to the landing page of your repository. | ||
| 59 | + 1. Click the **Code** button located in the middle of the page. | ||
| 60 | + 1. Click the **Codespaces** tab on the box that pops up. | ||
| 61 | + 1. Click the **Create codespace on main** button. | ||
| 62 | + | ||
| 63 | + > Wait about **2 minutes** for the codespace to spin itself up. | ||
| 64 | + | ||
| 65 | + 1. Verify your codespace is running, as you did previously. | ||
| 66 | + 1. Verify the `codespace.md` file now has the text `Writing code upon codespace creation!`. | ||
| 67 | + 1. Wait about 20 seconds then refresh this page (the one you're following instructions from). [GitHub Actions](https://docs.github.com/en/actions) will automatically update to the next step. | ||
| Original file line number | Diff line number | Diff line change | |
|---|---|---|---|
@@ -0,0 +1,73 @@ | |||
| 1 | + ## Step 4: Personalize your codespace! | ||
| 2 | + | ||
| 3 | + _Nicely done customizing your codespace!_ :partying_face: | ||
| 4 | + | ||
| 5 | + When using any development environment, customizing the settings and tools to your preferences and workflows is an important step. GitHub Codespaces offers two main ways of personalizing your codespace: `Settings Sync` with VS Code and `dotfiles`. | ||
| 6 | + | ||
| 7 | + `Dotfiles` will be the focus of this activity. | ||
| 8 | + | ||
| 9 | + **What are `dotfiles`?** Dotfiles are files and folders on Unix-like systems starting with . that control the configuration of applications and shells on your system. You can store and manage your dotfiles in a repository on GitHub. | ||
| 10 | + | ||
| 11 | + Let's see how this works! | ||
| 12 | + | ||
| 13 | + ### :keyboard: Activity: Enable a `dotfile` for your codespace | ||
| 14 | + | ||
| 15 | + 1. Start from the landing page of your repository. | ||
| 16 | + 1. In the upper-right corner of any page, click your profile photo, and then click **Settings**. | ||
| 17 | + 1. In the **Code, planning, and automation** section of the sidebar, click **Codespaces**. | ||
| 18 | + 1. Under **Dotfiles**, select **Automatically install dotfiles** so that GitHub Codespaces automatically installs your dotfiles into every new codespace you create. | ||
| 19 | + 1. Click **Select repository** and then choose your current skills working repository as the repository from which to install dotfiles. | ||
| 20 | + | ||
| 21 | + ### :keyboard: Activity: Add a `dotfile` to your repository and run your codespace | ||
| 22 | + | ||
| 23 | + 1. Start from the landing page of your repository. | ||
| 24 | + 1. Click the **Code** button located in the middle of the page. | ||
| 25 | + 1. Click the **Codespaces** tab on the box that pops up. | ||
| 26 | + 1. Click the **Create codespace on main** button. | ||
| 27 | + | ||
| 28 | + > Wait about **2 minutes** for the codespace to spin itself up. | ||
| 29 | + | ||
| 30 | + 1. Verify your codespace is running. The browser should contain a VS Code web-based editor and a terminal should be present such as the below: | ||
| 31 | +  | ||
| 32 | + | ||
| 33 | + 1. From inside the codespace in the VS Code explorer window, create a new file `setup.sh`. | ||
| 34 | + 1. Add the following code inside of the file: | ||
| 35 | + | ||
| 36 | + ``` | ||
| 37 | + #!/bin/bash | ||
| 38 | + | ||
| 39 | + sudo apt-get update | ||
| 40 | + sudo apt-get install sl | ||
| 41 | + ``` | ||
| 42 | + | ||
| 43 | + 1. Save the file. | ||
| 44 | + > **Note**: The file should autosave. | ||
| 45 | + 1. Commit the file changes. From the VS Code terminal enter: | ||
| 46 | + | ||
| 47 | + ``` | ||
| 48 | + git add setup.sh --chmod=+x | ||
| 49 | + git commit -m "Adding setup.sh from the codespace!" | ||
| 50 | + ``` | ||
| 51 | + | ||
| 52 | + 1. Push the changes back to your repository. From the VS Code terminal, enter: | ||
| 53 | + | ||
| 54 | + ``` | ||
| 55 | + git push | ||
| 56 | + ``` | ||
| 57 | + | ||
| 58 | + 1. Switch back to the homepage of your repository and view the `setup.sh` to verify the new code was pushed to your repository. | ||
| 59 | + 1. Close the codespace web browser tab. | ||
| 60 | + 1. Click the **Create codespace on main** button. | ||
| 61 | + | ||
| 62 | + > Wait about **2 minutes** for the codespace to spin itself up. | ||
| 63 | + | ||
| 64 | + 1. Verify your codespace is running, as you did previously. | ||
| 65 | + 1. Verify the `setup.sh` file is present in your VS Code editor. | ||
| 66 | + 1. From the VS Code terminal, type or paste: | ||
| 67 | + | ||
| 68 | + ``` | ||
| 69 | + /usr/games/sl | ||
| 70 | + ``` | ||
| 71 | + | ||
| 72 | + 1. Enjoy the show! | ||
| 73 | + 1. Wait about 20 seconds then refresh this page (the one you're following instructions from). [GitHub Actions](https://docs.github.com/en/actions) will automatically update to the next step. | ||
| Original file line number | Diff line number | Diff line change | |
|---|---|---|---|
@@ -0,0 +1,28 @@ | |||
| 1 | + ## Finish | ||
| 2 | + | ||
| 3 | + _Congratulations friend, you've completed this course!_ | ||
| 4 | + | ||
| 5 | + <img src="https://octodex.github.com/images/welcometocat.png" alt=celebrate width=300 align=right> | ||
| 6 | + | ||
| 7 | + Here's a recap of all the tasks you've accomplished in your repository: | ||
| 8 | + | ||
| 9 | + - You learned how to create a codespace and push code to your repository from the codespace. | ||
| 10 | + - You learned how to use custom images in your codespace. | ||
| 11 | + - You learned how to customize your codespace. | ||
| 12 | + - You learned how to personalize your codespace. | ||
| 13 | + | ||
| 14 | + ### Additional learning and resources | ||
| 15 | + | ||
| 16 | + - [Developing in a codespace](https://docs.github.com/en/codespaces/developing-in-codespaces/developing-in-a-codespace). Learn how to delete a codespace, open an existing codespace, connect to a private network, forward ports, and much more. | ||
| 17 | + - [Set up your repository](https://docs.github.com/en/codespaces/setting-up-your-project-for-codespaces/introduction-to-dev-containers). Learn how to set minimum machine specs for a codespace, add badges, set up a template repo, and much more. | ||
| 18 | + - [Personalize and customize GitHub Codespaces](https://docs.github.com/en/codespaces/customizing-your-codespace/personalizing-github-codespaces-for-your-account). Learn how to use setting sync for your codespace, add dotfiles, set the default region, set the default editor, and much more. | ||
| 19 | + - [Prebuild your codespace](https://docs.github.com/en/codespaces/prebuilding-your-codespaces/about-github-codespaces-prebuilds) | ||
| 20 | + - [Manage your codespace](https://docs.github.com/en/codespaces/managing-codespaces-for-your-organization/enabling-github-codespaces-for-your-organization) | ||
| 21 | + | ||
| 22 | + ### What's next? | ||
| 23 | + | ||
| 24 | + - Learn more about securing your supply chain by reading: [GitHub Codespaces overview](https://docs.github.com/en/codespaces/overview). | ||
| 25 | + - [We'd love to hear what you thought of this course](https://github.com/skills/.github/discussions). | ||
| 26 | + - [Learn another GitHub skill](https://github.com/skills). | ||
| 27 | + - [Read the Get started with GitHub docs](https://docs.github.com/en/get-started). | ||
| 28 | + - To find projects to contribute to, check out [GitHub Explore](https://github.com/explore). | ||
This file was deleted.
0 commit comments