

![[Google Cloud Documentation]](https://www.gstatic.com/devrel-devsite/prod/v0f3a5b8b76e4a120372a69044e02756e703b6140f9f1812c6e4a0407b19864b7/clouddocs/images/lockup_full_color.svg)
![[]](https://docs.cloud.google.com/_static/clouddocs/images/icons/products/bigquery-color.svg)
Run PySpark code in BigQuery Studio notebooks
This document shows you how to run PySpark code in a BigQuery Python notebook.
Before you begin
If you haven't already done so, create a Google Cloud project and a Cloud Storage bucket.
Set up your project
- Sign in to your Google Cloud account. If you're new to Google Cloud, create an account to evaluate how our products perform in real-world scenarios. New customers also get $300 in free credits to run, test, and deploy workloads.
-
In the Google Cloud console, on the project selector page, select or create a Google Cloud project.
Roles required to select or create a project
- Select a project: Selecting a project doesn't require a specific IAM role—you can select any project that you've been granted a role on.
-
Create a project: To create a project, you need the Project Creator role
(
roles/resourcemanager.projectCreator), which contains theresourcemanager.projects.createpermission. Learn how to grant roles.
Enable the Managed Service for Apache Spark, BigQuery, and Cloud Storage APIs.
Roles required to enable APIs
To enable APIs, you need the
serviceusage.services.enablepermission. If you created the project, then you likely already have this permission through the Owner role (roles/owner). Otherwise, you can get this permission through the Service Usage Admin role (roles/serviceusage.serviceUsageAdmin). Learn how to grant roles.-
In the Google Cloud console, on the project selector page, select or create a Google Cloud project.
Roles required to select or create a project
- Select a project: Selecting a project doesn't require a specific IAM role—you can select any project that you've been granted a role on.
-
Create a project: To create a project, you need the Project Creator role
(
roles/resourcemanager.projectCreator), which contains theresourcemanager.projects.createpermission. Learn how to grant roles.
Enable the Managed Service for Apache Spark, BigQuery, and Cloud Storage APIs.
Roles required to enable APIs
To enable APIs, you need the
serviceusage.services.enablepermission. If you created the project, then you likely already have this permission through the Owner role (roles/owner). Otherwise, you can get this permission through the Service Usage Admin role (roles/serviceusage.serviceUsageAdmin). Learn how to grant roles.
Create a Cloud Storage bucket in your project if you don't have one you can use.
Set up your notebook
- Notebook credentials: By default, your notebook session uses your
user credentials. Alternatively, it
can use session service account
credentials.
- User credentials: Your user account must have the following Identity and Access Management
roles:
- Managed Service for Apache Spark Editor (
roles/dataproc.editorrole) - BigQuery Studio User (
roles/bigquery.studioUserrole) - Service Account User (roles/iam.serviceAccountUser) role
on the session service account.
This role contains the required
iam.serviceAccounts.actAspermission to impersonate the service account.
- Managed Service for Apache Spark Editor (
- Service account credentials: If you want to specify service account credentials instead of user credentials for your notebook session, the session service account must have the following role:
- User credentials: Your user account must have the following Identity and Access Management
roles:
- Notebook runtime: Your notebook uses a default Gemini Enterprise Agent Platform runtime unless you select a different runtime. If you want to define your own runtime, create the runtime from the Runtimes page in the Google Cloud console. Note that when using the NumPy library, use NumPy version 1.26, which is supported by Spark 3.5, in the notebook runtime.
- Notebook credentials: By default, your notebook session uses your
user credentials. Alternatively, it
can use session service account
credentials.
Pricing
For pricing information, see BigQuery Notebook runtime pricing.
Open a BigQuery Studio Python notebook
In the Google Cloud console, go to the BigQuery page.
In the tab bar of the details pane, click the arrow next to the + sign, and then click Notebook.
Create a Spark session in a BigQuery Studio notebook
You can use a BigQuery Studio Python notebook to create a Spark Connect interactive session. Each BigQuery Studio notebook can have only one active Spark session associated with it.
You can create a Spark session in a BigQuery Studio Python notebook in the following ways:
- Configure and create a single session in the notebook.
- Configure a Spark session in an
interactive session template,
then use the template to configure and create a session in the notebook.
BigQuery provides a
Query using Sparkfeature that helps you start coding the templated session as explained under the Templated Spark session tab.
Single session
To create a Spark session in a new notebook, do the following:
In the tab bar of the editor pane, click the drop-down arrow next to the + sign, and then click Notebook.
 [Screenshot showing the BigQuery interface with the '+' button for creating a new notebook.]
Copy and run the following code in a notebook cell to configure and create a basic Spark session.
![[Screenshot showing the BigQuery interface with the '+' button for creating a new notebook.]](https://cloud.google.com/static/dataproc-serverless/docs/images/plus-python-notebook.png)
from google.cloud.dataproc_spark_connect import DataprocSparkSession
from google.cloud.dataproc_v1 import Session

import pyspark.sql.functions as f

session = Session()

# Create the Spark session.
spark = (
   DataprocSparkSession.builder
     .appName("APP_NAME")
     .dataprocSessionConfig(session)
     .getOrCreate()
)
Replace the following:
- APP_NAME: An optional name for your session.
- Optional Session settings: You can add Managed Service for Apache Spark API
Sessionsettings to customize your session. Here are some examples:RuntimeConfig: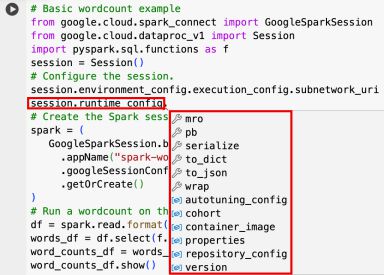 [Code help showing session.runtime.config options.]
session.runtime_config.properties={spark.property.key1:VALUE_1,...,spark.property.keyN:VALUE_N}session.runtime_config.container_image = path/to/container/image
EnvironmentConfig: [Code help showing session-environment-config-execution-config options.]
- session.environment_config.execution_config.subnetwork_uri = "SUBNET_NAME"
session.environment_config.execution_config.ttl = {"seconds": VALUE}session.environment_config.execution_config.service_account = SERVICE_ACCOUNT
![[Code help showing session.runtime.config options.]](https://cloud.google.com/static/dataproc-serverless/docs/images/session-runtime-config.png)
![[Code help showing session-environment-config-execution-config options.]](https://cloud.google.com/static/dataproc-serverless/docs/images/session-environment-execution-config.png)
Templated Spark session
You can enter and run the code in a notebook cell to
create a Spark session based on an existing
session template.
Any session configuration settings you provide in your notebook code will
override any of the same settings that are set in the session template.
To get started quickly, use the Query using Spark
template to pre-populate your notebook with Spark session template code:
- In the tab bar of the editor pane, click the
drop-down arrow next to the + sign, and then click
Notebook.
[Screenshot showing the BigQuery interface with the '+' button for creating a new notebook.]
- Under Start with a template, click Query using Spark, then click
Use template to insert the code in your notebook.
 [BigQuery UI selections to start with a template]
- Specify the variables as explained in the Notes.
- You can delete any additional sample code cells inserted in the notebook.
![[BigQuery UI selections to start with a template]](https://cloud.google.com/static/dataproc-serverless/docs/images/query-using-spark.png)
from google.cloud.dataproc_spark_connect import DataprocSparkSession
from google.cloud.dataproc_v1 import Session
session = Session()
project_id = "PROJECT_ID"
location = "LOCATION"
# Configure the session with an existing session template.
session_template = "SESSION_TEMPLATE"
session.session_template = f"projects/{project_id}/locations/{location}/sessionTemplates/{session_template}"
# Create the Spark session.
spark = (
   DataprocSparkSession.builder
     .appName("APP_NAME")
     .dataprocSessionConfig(session)
     .getOrCreate()
)
- PROJECT_ID: Your project ID, which is listed in the Project info section of the Google Cloud console dashboard.
- LOCATION: The Compute Engine region where your notebook session will run. If not supplied, the region of the VM that creates the notebook will be used.
SESSION_TEMPLATE: The name of an existing interactive session template. Session configuration settings are obtained from the template. The template must also specify the following settings:
- Runtime version
2.3+ Notebook type:
Spark ConnectExample:
 [Screenshot showing the Spark Connect required settings.]
- Runtime version
APP_NAME: An optional name for your session.
![[Screenshot showing the Spark Connect required settings.]](https://cloud.google.com/static/dataproc-serverless/docs/images/console-template-spark-connect.png)
Write and run PySpark code in your BigQuery Studio notebook
After you create a Spark session in your notebook, use the session to run Spark notebook code in the notebook.
Spark Connect PySpark API support: Your Spark Connect notebook session supports most PySpark APIs, including DataFrame, Functions, and Column, but does not support SparkContext and RDD and other PySpark APIs. For more information, see What is supported in Spark 3.5.
Tip: You can check the Spark SQL API reference to find out if Spark Connect supports an API. The documentation for a supported API contains a "Supports Spark Connect." message: [Supports Spark Connect message]
![[Supports Spark Connect message]](https://cloud.google.com/static/dataproc-serverless/docs/images/supports-spark-connect.png)
Spark Connect notebook direct writes: Spark sessions in a BigQuery Studio notebook pre-configure the Spark BigQuery connector to make DIRECT data writes. The DIRECT write method uses the BigQuery Storage Write API, which writes data directly into BigQuery; the INDIRECT write method, which is the default for Managed Service for Apache Spark batches, writes data to an intermediate Cloud Storage bucket, then writes the data to BigQuery (for more information on INDIRECT writes, see Read and write data from and to BigQuery).
Managed Service for Apache Spark specific APIs: Managed Service for Apache Spark simplifies
adding PyPI packages dynamically to your
Spark session by extending the addArtifacts method. You can specify the list in
version-scheme format,
(similar to pip install). This instructs the Spark Connect server
to install packages and their dependencies on all cluster nodes, making them
available to workers for your UDFs.
Example that installs specified textdistance version and latest compatible
random2 libraries on the cluster to allow UDFs using textdistance and random2
to run on worker nodes.
spark.addArtifacts("textdistance==4.6.1", "random2", pypi=True)
Notebook code help: The BigQuery Studio notebook provides code help when you hold the pointer over a class or method name, and provides code completion help as you input code.
In the following example, entering DataprocSparkSession and holding the
pointer over this class name displays code completion
and documentation help.
 [Code documentation and code completion tip examples.]
Tip: See Dataproc Spark Connect Client
on GitHub for information on using
[Code documentation and code completion tip examples.]
Tip: See Dataproc Spark Connect Client
on GitHub for information on using ![[Code documentation and code completion tip examples.]](https://cloud.google.com/static/dataproc-serverless/docs/images/bq-notebook-code-tips.png)
DataprocSparkSession.builder methods to configure
Spark Connect sessions.
BigQuery Studio notebook PySpark examples
This section provides BigQuery Studio Python notebook examples with PySpark code to perform the following tasks:
- Run a wordcount against a public Shakespeare dataset.
- Create an Iceberg table with metadata saved in Lakehouse runtime catalog.
Wordcount
The following PySpark example creates a Spark session, then counts word
occurrences in a public bigquery-public-data.samples.shakespeare dataset.
# Basic wordcount example
from google.cloud.dataproc_spark_connect import DataprocSparkSession
from google.cloud.dataproc_v1 import Session
import pyspark.sql.functions as f
session = Session()

# Create the Spark session.
spark = (
   DataprocSparkSession.builder
     .appName("APP_NAME")
     .dataprocSessionConfig(session)
     .getOrCreate()
)
# Run a wordcount on the public Shakespeare dataset.
df = spark.read.format("bigquery").option("table", "bigquery-public-data.samples.shakespeare").load()
words_df = df.select(f.explode(f.split(f.col("word"), " ")).alias("word"))
word_counts_df = words_df.filter(f.col("word") != "").groupBy("word").agg(f.count("*").alias("count")).orderBy("word")
word_counts_df.show()
Replace the following:
- APP_NAME: An optional name for your session.
Output:
The cell output lists a sample of the wordcount output. To see session details in the Google Cloud console, click the Interactive Session Detail View link. A Spark details panel opens that provides tabs for Logs, Executors, SQL, and Jobs (including an event timeline). To monitor your Spark session, click View Spark UI on the session details page.
 [View Spark UI button in session details page in console]
![[View Spark UI button in session details page in console]](https://cloud.google.com/static/dataproc-serverless/docs/images/view-spark-ui.png)
Interactive Session Detail View: LINK
+------------+-----+
|        word|count|
+------------+-----+
|           '|   42|
|       ''All|    1|
|     ''Among|    1|
|       ''And|    1|
|       ''But|    1|
|    ''Gamut'|    1|
|       ''How|    1|
|        ''Lo|    1|
|      ''Look|    1|
|        ''My|    1|
|       ''Now|    1|
|         ''O|    1|
|      ''Od's|    1|
|       ''The|    1|
|       ''Tis|    4|
|      ''When|    1|
|       ''tis|    1|
|      ''twas|    1|
|          'A|   10|
|'ARTEMIDORUS|    1|
+------------+-----+
only showing top 20 rows
Iceberg table
Run PySpark code to create an Iceberg table with Lakehouse runtime catalog metadata
The following example code creates a sample_iceberg_table with
table metadata stored in Lakehouse runtime catalog, and then queries the
table.
from google.cloud.dataproc_spark_connect import DataprocSparkSession
from google.cloud.dataproc_v1 import Session
# Create the Dataproc Serverless session.
session = Session()
# Set the session configuration for BigLake Metastore with the Iceberg environment.
project_id = "PROJECT_ID"
region = "REGION"
subnet_name = "SUBNET_NAME"
location = "LOCATION"
session.environment_config.execution_config.subnetwork_uri = f"{subnet_name}"
warehouse_dir = "gs://BUCKET/WAREHOUSE_DIRECTORY"
catalog = "CATALOG"
namespace = "NAMESPACE"
session.runtime_config.properties[f"spark.sql.catalog.{catalog}"] = "org.apache.iceberg.spark.SparkCatalog"
session.runtime_config.properties[f"spark.sql.catalog.{catalog}.catalog-impl"] = "org.apache.iceberg.gcp.bigquery.BigQueryMetastoreCatalog"
session.runtime_config.properties[f"spark.sql.catalog.{catalog}.gcp_project"] = f"{project_id}"
session.runtime_config.properties[f"spark.sql.catalog.{catalog}.gcp_location"] = f"{location}"
session.runtime_config.properties[f"spark.sql.catalog.{catalog}.warehouse"] = f"{warehouse_dir}"
# Create the Spark Connect session.
spark = (
   DataprocSparkSession.builder
     .appName("APP_NAME")
     .dataprocSessionConfig(session)
     .getOrCreate()
)
# Create the namespace in BigQuery.
spark.sql(f"USE `{catalog}`;")
spark.sql(f"CREATE NAMESPACE IF NOT EXISTS `{namespace}`;")
spark.sql(f"USE `{namespace}`;")
# Create the Iceberg table.
spark.sql("DROP TABLE IF EXISTS `sample_iceberg_table`");
spark.sql("CREATE TABLE sample_iceberg_table (id int, data string) USING ICEBERG;")
spark.sql("DESCRIBE sample_iceberg_table;")
# Insert table data and query the table.
spark.sql("INSERT INTO sample_iceberg_table VALUES (1, \"first row\");")
# Alter table, then query and display table data and schema.
spark.sql("ALTER TABLE sample_iceberg_table ADD COLUMNS (newDoubleCol double);")
spark.sql("DESCRIBE sample_iceberg_table;")
df = spark.sql("SELECT * FROM sample_iceberg_table")
df.show()
df.printSchema()
Notes:
- PROJECT_ID: Your project ID, which is listed in the Project info section of the Google Cloud console dashboard.
- REGION and SUBNET_NAME: Specify the Compute Engine region and the name of a subnet in the session region. Managed Service for Apache Spark enables Private Google Access (PGA) on the specified subnet.
- LOCATION: The default
BigQuery_metastore_config.locationandspark.sql.catalog.{catalog}.gcp_locationisUS, but you can choose any supported BigQuery location. - BUCKET and WAREHOUSE_DIRECTORY: The Cloud Storage bucket and folder used for Iceberg warehouse directory.
- CATALOG and NAMESPACE: The Iceberg catalog name
and namespace combine to identify the Iceberg table (
catalog.namespace.table_name). - APP_NAME: An optional name for your session.
The cell output lists the sample_iceberg_table with the added column, and displays
a link to the Interactive Session Details page in the Google Cloud console.
A Spark details panel opens that provides tabs for Logs, Executors, SQL, and Jobs (including an event timeline).
You can click View Spark UI on the session details page to monitor your
Spark session.
[view-spark-ui.png]
Interactive Session Detail View: LINK
+---+---------+------------+
| id|     data|newDoubleCol|
+---+---------+------------+
|  1|first row|        NULL|
+---+---------+------------+

root
 |-- id: integer (nullable = true)
 |-- data: string (nullable = true)
 |-- newDoubleCol: double (nullable = true)
View table details in BigQuery
Perform the following steps to check Iceberg table details in BigQuery:
In the Google Cloud console, go to the BigQuery page.
In the project resources pane, click your project, then click your namespace to list the
sample_iceberg_tabletable. Click the Details table to view the Open Catalog Table Configuration information.The input and output formats are the standard Hadoop
InputFormatandOutputFormatclass formats that Iceberg uses. [Iceberg table metadata listed in BigQuery UI]
![[Iceberg table metadata listed in BigQuery UI]](https://cloud.google.com/static/dataproc-serverless/docs/images/iceberg-in-bq.png)
Other examples
Create a Spark DataFrame (sdf) from a Pandas DataFrame (df).
sdf = spark.createDataFrame(df)
sdf.show()
Run aggregations on Spark DataFrames.
from pyspark.sql import functions as f

sdf.groupby("segment").agg(
   f.mean("total_spend_per_user").alias("avg_order_value"),
   f.approx_count_distinct("user_id").alias("unique_customers")
).show()
Read from BigQuery using the Spark-BigQuery connector.
spark.conf.set("viewsEnabled","true")
spark.conf.set("materializationDataset","my-bigquery-dataset")

sdf = spark.read.format('bigquery') \
 .load(query)
Write Spark code with Gemini Code Assist
Preview
This product or feature is subject to the "Pre-GA Offerings Terms" in the General Service Terms section of the Service Specific Terms. Pre-GA products and features are available "as is" and might have limited support. For more information, see the launch stage descriptions.
You can ask Gemini Code Assist to generate PySpark code in your notebook. Gemini Code Assist fetches and uses relevant BigQuery and Dataproc Metastore tables and their schemas to generate a code response.
To generate Gemini Code Assist code in your notebook, do the following:
Insert a new code cell by clicking + Code in the toolbar. The new code cell displays
Start coding or generate with AI. Click generate.In the Generate editor, enter a natural language prompt, and then click
enter. Make sure to include the keywordsparkorpysparkin your prompt.Sample prompt:
create a spark dataframe from order_items and filter to orders created in 2024
Sample output:
spark.read.format("bigquery").option("table", "sqlgen-testing.pysparkeval_ecommerce.order_items").load().filter("year(created_at) = 2024").createOrReplaceTempView("order_items")
df = spark.sql("SELECT * FROM order_items")
Tips for Gemini Code Assist code generation
To let Gemini Code Assist fetch relevant tables and schemas, turn on Data Catalog sync for Dataproc Metastore instances.
Make sure your user account has access to Data Catalog the query tables. To do this, assign the
DataCatalog.Viewerrole.
End the Spark session
You can take any of the following actions to stop your Spark Connect session in your BigQuery Studio notebook:
- Run
spark.stop()in a notebook cell. - Terminate the runtime in the notebook:
- Click the runtime selector, then click Manage sessions.
 [Manage sessions selection]
- In the Active sessions dialog, click the terminate icon, then
click Terminate.
 [Terminate session selection in Active sessions dialog]
- Click the runtime selector, then click Manage sessions.
![[Manage sessions selection]](https://cloud.google.com/static/dataproc-serverless/docs/images/manage-runtime-in-bq-notebook.png)
![[Terminate session selection in Active sessions dialog]](https://cloud.google.com/static/dataproc-serverless/docs/images/terminate-session-in-bq-notebook.png)
Orchestrate BigQuery Studio notebook code
You can orchestrate BigQuery Studio notebook code in the following ways:
Schedule notebook code from the Google Cloud console (notebook pricing applies).
Run notebook code as a batch workload (Managed Service for Apache Spark pricing applies).
Schedule notebook code from the Google Cloud console
You can schedule notebook code in the following ways:
- Schedule the notebook.
- If notebook code execution is part of a workflow, schedule the notebook as part of a pipeline.
Run notebook code as a batch workload
Complete the following steps to run BigQuery Studio notebook code as a batch workload.
Download notebook code into a file in a local terminal or in Cloud Shell. Downloading to and working in Cloud Shell is recommended since it pre-installs text editors and other tools and provides built-in Python support.
In the Google Cloud console, on the BigQuery Studio page, open the notebook in the Explorer pane.
To expand the menu bar, click keyboard_arrow_down Toggle header visibility.
Click File > Download, and then click Download.py.
 [download-pyspark-notebook.png] Download menu on the Explorer page.">
Generate
requirements.txt.- Install
pipreqsin the directory where you saved your.pyfile.pip install pipreqs
Run
pipreqsto generaterequirements.txt.pipreqs filename.py
Use the Google Cloud CLI to copy the local
requirements.txtfile to a bucket in Cloud Storage.gcloud storage cp requirements.txt gs://BUCKET/
- Install
Update Spark session code by editing the downloaded
.pyfile.Remove or comment out any shell script commands.
Remove code that configures the Spark session, and then specify config parameters as batch workload submit parameters. (see Submit a Spark batch workload).
Example:
Remove the following session subnet config line from the code:
session.environment_config.execution_config.subnetwork_uri = "{subnet_name}"When you run your batch workload, use the
--subnetflag to specify the subnet.gcloud dataproc batches submit pyspark \ --subnet=SUBNET_NAME
Use a simple session creation code snippet.
Sample downloaded notebook code before simplification.
from google.cloud.dataproc_spark_connect import DataprocSparkSession
from google.cloud.dataproc_v1 import Session

session = Session()
spark = DataprocSparkSession \
    .builder \
    .appName("CustomSparkSession")
    .dataprocSessionConfig(session) \
    .getOrCreate()
Batch workload code after simplification.
from pyspark.sql import SparkSession

spark = SparkSession \
.builder \
.getOrCreate()
-
See Submit the Spark batch workload for instructions.
Make sure to include the --deps-bucket flag to point to the Cloud Storage bucket that contains your
requirements.txtfile.Example:
gcloud dataproc batches submit pyspark FILENAME.py \
    --region=REGION \
    --deps-bucket=BUCKET \
    --version=2.3
Notes:
- FILENAME: The name of your downloaded and edited notebook code file.
- REGION: The Compute Engine region where your cluster is located.
- BUCKET The name of the Cloud Storage bucket
that contains your
requirements.txtfile. --version: spark runtime version 2.3 is selected to run the batch workload.
Commit your code.
- After testing your batch workload code, you can commit the
.ipynbor.pyfile to your repository using yourgitclient, such as GitHub, GitLab, or Bitbucket, as part of your CI/CD pipeline.
- After testing your batch workload code, you can commit the
Schedule your batch workload with Managed Service for Apache Airflow.
- See Run Managed Service for Apache Spark workloads with Managed Airflow for instructions.
![[download-pyspark-notebook.png]](https://cloud.google.com/static/dataproc-serverless/docs/images/download-pyspark-notebook.png)
Troubleshoot notebook errors
If a failure occurs in a cell containing Spark code, you can troubleshoot the error by clicking the Interactive Session Detail View link in the cell output (see the Wordcount and Iceberg table examples).
When you encounter a notebook code error, navigating to the last Spark job in the Spark UI often provides additional information to help you debug the failed job.Known issues and solutions
Error: A Notebook runtime
created with Python version 3.10 can cause a PYTHON_VERSION_MISMATCH error
when it attempts to connect to the Spark session.
Solution: Recreate the runtime with Python version 3.11.