


Extension Docs
Topics Overview Overview Node.js Python ASP.NET Core Debug Docker Compose Registries Deploy to Azure Choose a Dev Environment Customize Develop with Kubernetes Tips and Tricks Overview Jupyter Notebooks Data Science Tutorial Python Interactive Data Wrangler Quick Start Data Wrangler PyTorch Support Azure Machine Learning Manage Jupyter Kernels Jupyter Notebooks on the Web Data Science in Microsoft Fabric Foundry Toolkit Overview Foundry Toolkit Copilot Tools Create Agents Models Playground Agent Builder Agent Inspector Hosted Agents (Preview) Evaluation Tool Catalog Fine-Tuning (Automated Setup) Fine-Tuning (Project Template) Model Conversion Tracing Profiling (Windows ML) FAQ Reference File Structure Manual Model Conversion Manual Model Conversion on GPU Setup Environment Without Foundry Toolkit Update Project Template Project Migrating from Visualizer to Agent Inspector Overview Getting Started Resources View Deployment VS Code for the Web - Azure Containers Azure Kubernetes Service Kubernetes MongoDB Remote Debugging for Node.js Overview Tutorial Attach to Container Create Dev Container Advanced Containers devcontainer.json Dev Container CLI Tips and Tricks FAQOn this page there are 9 sections
Python in a container
In this tutorial, you will learn how to:
- Create a
Dockerfilefile describing a simple Python container. - Build, run, and verify the functionality of a Django, Flask, or General Python app.
- Debug the app running in a container.
Prerequisites
-
Install Docker on your machine and add it to the system path.
-
On Linux, you should also enable Docker CLI for the non-root user account that will be used to run VS Code.
-
The Container Tools extension. To install the extension, open the Extensions view (X (Windows, Linux Ctrl+Shift+X)), search for
container toolsto filter results and select the Container Tools extension authored by Microsoft.

Create a Python project
If you don't have a Python project already, follow the tutorial Getting started with Python.
Note: If you want to containerize a complete Django or Flask web app, you can start with one of the following samples:
python-sample-vscode-django-tutorial, which is the result of following the Django Tutorial
python-sample-vscode-flask-tutorial, which is the result of following the Flask Tutorial
Note: For this tutorial, be sure to use the tutorial branch of the sample repos.
After verifying your app runs properly, you can now containerize your application.
Add Docker files to the project
-
Open the project folder in VS Code.
-
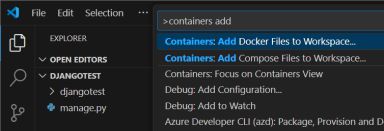
Open the Command Palette (P (Windows, Linux Ctrl+Shift+P)) and choose Containers: Add Docker Files to Workspace...:
-
When prompted for the app type, select Python: Django, Python: Flask, or Python: General as the app type. For this tutorial, we'll focus on the Python: General case, but will also include notes for Django and Flask.
-
Enter the relative path to the app's entry point. This excludes the workspace folder you start from. If you created a python app with
hello.pyaccording to the Getting Started with Python tutorial, choose that.Django: Choose
manage.py(root folder) orsubfolder_name/manage.py. See the official Django documentation.Flask: Choose the path to where you create your Flask instance. See the official Flask documentation.
Tip: You may also enter the path to a folder name as long as this folder includes a
__main__.pyfile. -
Select the port number. We recommend selecting port 1024 or above to mitigate security concerns from running as a root user. Any unused will port, but Django and Flask use standard default ports.
Django: The default port 8000.
Flask: The default port is 5000.
-
When prompted to include Docker Compose, select No if you do not want a Docker Compose file. If you select Yes, you will need to verify the path to your
wsgi.pyfile in theDockerfileto run the Compose Up command successfully. Compose is typically used when running multiple containers at once. -
With all this information, the Container Tools extension creates the following files:
-
A
Dockerfile. To learn more about IntelliSense in this file, refer to the overview. -
A
.dockerignorefile to reduce the image size by excluding files and folders that aren't needed such as.git,.vscode, and__pycache__. -
If you're using Docker Compose, a
docker-compose.ymlanddocker-compose.debug.ymlfile. -
If one does not already exist, a
requirements.txtfile for capturing all app dependencies.
Important Note: To use our setup, the Python framework (Django/Flask) and Gunicorn must be included in the
requirements.txtfile. If the virtual environment/host machine already has these prerequisites installed and is supposed to be identical to the container environment, ensure app dependencies are ported over by runningpip freeze > requirements.txtin the terminal. This will overwrite your currentrequirements.txtfile. -
(Optional) Add an environment variable to the image
This step is not required, but it is included to help you understand how to add environment variables that need to be set in the container's environment.
The Container Tools extension helps you author Dockerfiles by using IntelliSense to provide auto-completions and contextual help. To see this feature in action:
-
Open the
Dockerfile. -
Underneath the
EXPOSEstatement, type Space (Windows, Linux Ctrl+Space) to trigger IntelliSense and scroll toENV. -
Press Tab or Enter to complete the statement, then set the
keyto the name of the variable, and set thevalue.

![[]](https://code.visualstudio.com/assets/icons/search-dark.svg)
![[]](https://code.visualstudio.com/assets/icons/search.svg)
![[Switch to the dark theme]](https://code.visualstudio.com/assets/icons/theme-light.svg)
![[Switch to the light theme]](https://code.visualstudio.com/assets/icons/theme-dark.svg)
![[Select Container Tools extension]](https://code.visualstudio.com/assets/docs/containers/overview/installation-extension-search.png)
![[Add Dockerfile to a Python project]](https://code.visualstudio.com/assets/docs/containers/quickstarts/python-add-python.png)
![[Adding environment variable to Dockerfile]](https://code.visualstudio.com/assets/docs/containers/quickstarts/python-edit-dockerfile.png)
For more information about setting and using environment variables in the Dockerfile, see the ENV instruction and Environment replacement section in the Docker documentation.
Gunicorn modifications for Django and Flask apps
To give Python web developers a great starting point, we chose to use Gunicorn as the default web server. Since it is referenced in the default Dockerfile, it is included as a dependency in the requirements.txt file. If you don't see it in requirements.txt, run pip install gunicorn and then run pip freeze > requirements.txt to regenerate the requirements.txt file.
-
Django: To use Gunicorn, it must bind to an application callable (what the application server uses to communicate with your code) as an entry point. This callable is declared in the
wsgi.pyfile of a Django application. To accomplish this binding, the final line in the Dockerfile says:from flask import Flask app = Flask(__name__) # Flask instance named appTo accomplish this binding, the final line in the Dockerfile says:
Web Proxy Viewer | New URL | Original Page