

By using VS Code, you agree to its license and privacy statement. By using VS Code, you agree to License & Privacy.
Languages
Topics Overview JavaScript JSON HTML Emmet CSS, SCSS and Less TypeScript Markdown PowerShell C++ Java PHP Python Julia R Ruby Rust Go T-SQL C# .NET Swift Working with JavaScript Node.js Tutorial Node.js Debugging Deploy Node.js Apps Browser Debugging Angular Tutorial React Tutorial Vue Tutorial Debugging Recipes Performance Profiling Extensions Tutorial Transpiling Editing Refactoring Debugging Quick Start Tutorial Run Python Code Editing Linting Formatting Debugging Environments Testing Python Interactive Django Tutorial FastAPI Tutorial Flask Tutorial Create Containers Deploy Python Apps Python in the Web Settings Reference Getting Started Navigate and Edit Refactoring Formatting and Linting Project Management Build Tools Run and Debug Testing Spring Boot Modernizing Java Apps Application Servers Deploy Java Apps GUI Applications Extensions FAQ Intro Videos GCC on Linux GCC on Windows GCC on Windows Subsystem for Linux Clang on macOS Microsoft C++ on Windows Build with CMake CMake Tools on Linux CMake Quick Start C++ Dev Tools for Copilot Editing and Navigating Debugging Configure Debugging Refactoring Settings Reference Configure IntelliSense Configure IntelliSense for Cross-Compiling FAQ Intro Videos Get Started Navigate and Edit IntelliCode Refactoring Formatting and Linting Project Management Build Tools Package Management Run and Debug Testing FAQOn this page there are 10 sections
Flask Tutorial in Visual Studio Code
Flask is a lightweight Python framework for web applications that provides the basics for URL routing and page rendering.
Flask is called a "micro" framework because it doesn't directly provide features like form validation, database abstraction, authentication, and so on. Such features are instead provided by special Python packages called Flask extensions. The extensions integrate seamlessly with Flask so that they appear as if they were part of Flask itself. For example, Flask doesn't provide a page template engine, but installing Flask includes the Jinja templating engine by default. For convenience, we typically speak of these defaults as part of Flask.
In this Flask tutorial, you create a simple Flask app with three pages that use a common base template. Along the way, you experience a number of features of Visual Studio Code including using the terminal, the editor, the debugger, code snippets, and more.
The completed code project for this Flask tutorial can be found on GitHub: python-sample-vscode-flask-tutorial.
If you have any problems, you can search for answers or ask a question on the Python extension Discussions Q&A.
Prerequisites
To successfully complete this Flask tutorial, you must do the following (which are the same steps as in the general Python tutorial):
-
Install the Python extension.
-
Install a version of Python 3 (for which this tutorial is written). Options include:
- (All operating systems) A download from python.org; typically use the Download button that appears first on the page.
- (Linux) The built-in Python 3 installation works well, but to install other Python packages you must run
sudo apt install python3-pipin the terminal. - (macOS) An installation through Homebrew on macOS using
brew install python3. - (All operating systems) A download from Anaconda (for data science purposes).
-
On Windows, make sure the location of your Python interpreter is included in your PATH environment variable. You can check the location by running
pathat the command prompt. If the Python interpreter's folder isn't included, open Windows Settings, search for "environment", select Edit environment variables for your account, then edit the Path variable to include that folder.
Create a project environment for the Flask tutorial
In this section, you create a virtual environment in which Flask is installed. Using a virtual environment avoids installing Flask into a global Python environment and gives you exact control over the libraries used in an application.
The Python Environments extension supports multiple environment types including venv, conda, poetry, and others. This tutorial uses venv because it's built into Python and requires no additional tools. The steps for other environment types are similar see Create environments for details.
-
On your file system, create a folder for this tutorial, such as
hello_flask. -
Open this folder in VS Code by navigating to the folder in a terminal and running
code ., or by running VS Code and using the File > Open Folder command. -
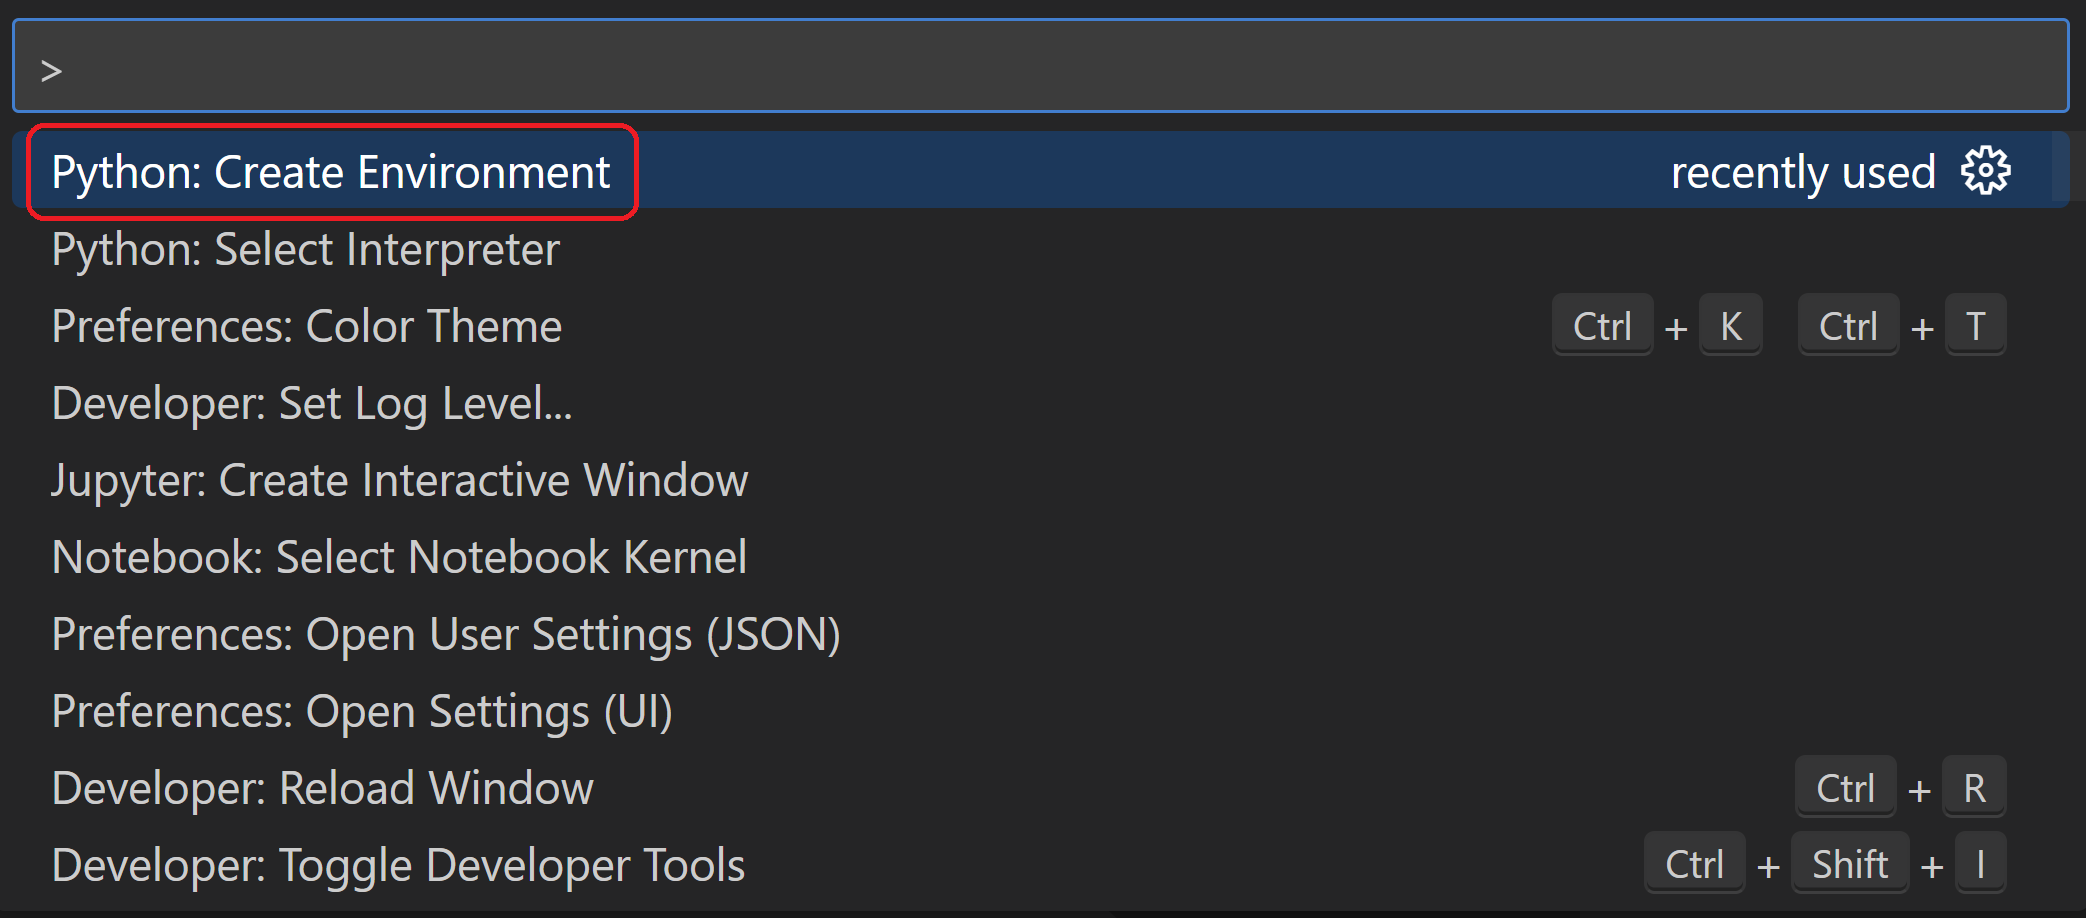
Create a virtual environment by using the Python: Create Environment command:
- Open the Command Palette (P (Windows, Linux Ctrl+Shift+P))
- Search for and select Python: Create Environment
- Select Venv to create a venv environment
- Select a Python interpreter to use for the environment
VS Code creates a
.venvfolder in your workspace and automatically selects the new environment.TipYou can also create environments using the Python sidebar. Expand Environment Managers and select the + button for Quick Create, which uses sensible defaults.
-
Install Flask in the virtual environment using one of these methods:
Using the Package Management UI:
- In the Python sidebar, expand Environment Managers
- Right-click on your
.venvenvironment and select Manage Packages - Search for
flaskand select Install
Using the terminal:
Run Terminal: Create New Terminal (` (Windows, Linux Ctrl+Shift+`)) from the Command Palette, which creates a terminal and automatically activates the virtual environment. Then run:
from flask import Flask app = Flask(__name__) -
Also in
app.py, add a function that returns content, in this case a simple string, and use Flask'sapp.routedecorator to map the URL route/to that function:(.venv) D:\py\\hello_flask>python -m flask run * Environment: production WARNING: Do not use the development server in a production environment. Use a production WSGI server instead. * Debug mode: off * Running on http://127.0.0.1:5000/ (Press CTRL+C to quit)If you see an error that the Flask module cannot be found, make sure you've run
python -m pip install flaskin your virtual environment as described at the end of the previous section.Also, if you want to run the development server on a different IP address or port, use the host and port command-line arguments, as with
--host=0.0.0.0 --port=80. -
To open your default browser to the rendered page, Ctrl+click the
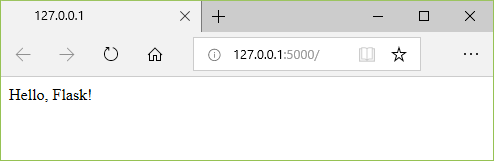
http://127.0.0.1:5000/URL in the terminal. -
Observe that when you visit a URL like /, a message appears in the debug terminal showing the HTTP request:
import re
from datetime import datetime

from flask import Flask

app = Flask(__name__)


@app.route("/")
def home():
    return "Hello, Flask!"


@app.route("/hello/<name>")
def hello_there(name):
    now = datetime.now()
    formatted_now = now.strftime("%A, %d %B, %Y at %X")

    # Filter the name argument to letters only using regular expressions. URL arguments
    # can contain arbitrary text, so we restrict to safe characters only.
    match_object = re.match("[a-zA-Z]+", name)

    if match_object:
        clean_name = match_object.group(0)
    else:
        clean_name = "Friend"

    content = "Hello there, " + clean_name + "! It's " + formatted_now
    return content
The decorator used for the new URL route,
/hello/<name>, defines an endpoint /hello/ that can accept any additional value. The identifier inside<and>in the route defines a variable that is passed to the function and can be used in your code.URL routes are case-sensitive. For example, the route
/hello/<name>is distinct from/Hello/<name>. If you want the same function to handle both, use decorators for each variant.As described in the code comments, always filter arbitrary user-provided information to avoid various attacks on your app. In this case, the code filters the name argument to contain only letters, which avoids injection of control characters, HTML, and so forth. (When you use templates in the next section, Flask does automatic filtering and you won't need this code.)
-
Set a breakpoint at the first line of code in the
hello_therefunction (now = datetime.now()) by doing any one of the following:- With the cursor on that line, press F9, or,
- With the cursor on that line, select the Run > Toggle Breakpoint menu command, or,
- Click directly in the margin to the left of the line number (a faded red dot appears when hovering there).
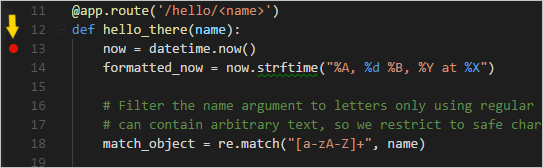
The breakpoint appears as a red dot in the left margin:
 [Flask tutorial: a breakpoint set on the first line of the hello_there function]
-
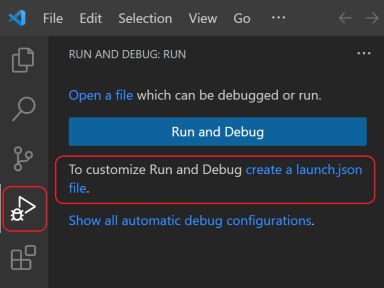
Switch to the Run and Debug view in VS Code (using the left-side activity bar or D (Windows, Linux Ctrl+Shift+D)). You may see the message "To customize Run and Debug create a launch.json file". This means that you don't yet have a
launch.jsonfile containing debug configurations. VS Code can create that for you if you click on the create a launch.json file link: -
Select the link and VS Code will prompt for a debug configuration. Select Flask from the dropdown and VS Code will populate a new
launch.jsonfile with a Flask run configuration. Thelaunch.jsonfile contains a number of debugging configurations, each of which is a separate JSON object within theconfigurationarray. -
Scroll down to and examine the configuration, which is named "Python: Flask". This configuration contains
"module": "flask",, which tells VS Code to run Python with-m flaskwhen it starts the debugger. It also defines the FLASK_APP environment variable in theenvproperty to identify the startup file, which isapp.pyby default, but allows you to easily specify a different file. If you want to change the host and/or port, you can use theargsarray.now.strftime("%A, %d %B, %Y at %X") 'Wednesday, 31 October, 2018 at 18:13:39'Tip: The Debug Console also shows exceptions from within the app that may not appear in the terminal. For example, if you see a "Paused on exception" message in the Call Stack area of Run and Debug view, switch to the Debug Console to see the exception message.
-
Copy that line into the > prompt at the bottom of the debug console, and try changing the formatting:
<!DOCTYPE html> <html> <head> <meta charset="utf-8" /> <title>Hello, Flask</title> </head> <body> {%if name %} <strong>Hello there, {{ name }}!</strong> It's {{ date.strftime("%A, %d %B, %Y at %X") }}. {% else %} What's your name? Provide it after /hello/ in the URL. {% endif %} </body> </html>Tip: Flask developers often use the flask-babel extension for date formatting, rather than
strftime, as flask-babel takes locales and timezones into consideration. -
In
app.py, import Flask'srender_templatefunction near the top of the file:@app.route("/hello/") @app.route("/hello/<name>") def hello_there(name = None): return render_template( "hello_there.html", name=name, date=datetime.now() )You can see that the code is now much simpler, and concerned only with data values, because the markup and formatting is all contained in the template.
-
Start the program (inside or outside of the debugger, using F5 (Windows, Linux Ctrl+F5)), navigate to a /hello/name URL, and observe the results.
-
Also try navigating to a /hello/name URL using a name like
<a%20value%20that%20could%20be%20HTML>to see Flask's automatic escaping at work. The "name" value shows up as plain text in the browser rather than as rendering an actual element.


Serve static files
Static files are of two types. First are those files like stylesheets to which a page template can just refer directly. Such files can live in any folder in the app, but are commonly placed within a static folder.
The second type are those that you want to address in code, such as when you want to implement an API endpoint that returns a static file. For this purpose, the Flask object contains a built-in method, send_static_file, which generates a response with a static file contained within the app's static folder.
The following sections demonstrate both types of static files.
Refer to static files in a template
-
In the
hello_flaskfolder, create a folder namedstatic. -
Within the
staticfolder, create a file namedsite.csswith the following contents. After entering this code, also observe the syntax highlighting that VS Code provides for CSS files, including a color preview:<link rel="stylesheet" type="text/css" href="{{ url_for('static', filename='site.css')}}" />Flask's url_for tag that is used here, creates the appropriate path to the file. Because it can accept variables as arguments,
url_forallows you to programmatically control the generated path, if desired. -
Also in
templates/hello_there.html, replace the contents<body>element with the following markup that uses themessagestyle instead of a<strong>tag (and also displays a message if you just use a hello/ URL without a name):{ "01": { "note": "This data is very simple because we're demonstrating only the mechanism." } } -
In
app.py, add a function with the route /api/data that returns the static data file using thesend_static_filemethod:<!DOCTYPE html> <html> <head> <meta charset="utf-8" /> <title>{% block title %}{% endblock %}</title> <link rel="stylesheet" type="text/css" href="{{ url_for('static', filename='site.css')}}" /> </head> <body> <div class="navbar"> <a href="{{ url_for('home') }}" class="navbar-brand">Home</a> <a href="{{ url_for('about') }}" class="navbar-item">About</a> <a href="{{ url_for('contact') }}" class="navbar-item">Contact</a> </div> <div class="body-content"> {% block content %} {% endblock %} <hr/> <footer> <p>© 2018</p> </footer> </div> </body> </html> -
Add the following styles to
static/site.css, below the existing "message" style, and save the file. Note that this walkthrough doesn't attempt to demonstrate responsive design; these styles simply generate a reasonably interesting result."Flask Tutorial: template extending layout.html": { "prefix": "flextlayout", "body": [ "{% extends \"layout.html\" %}", "{% block title %}", "$0", "{% endblock %}", "{% block content %}", "{% endblock %}" ], "description": "Boilerplate template that extends layout.html" }, -
Save the
html.jsonfile (S (Windows, Linux Ctrl+S)). -
Now, whenever you start typing the snippet's prefix, such as
flext, VS Code provides the snippet as an autocomplete option, as shown in the next section. You can also use the Insert Snippet command to choose a snippet from a menu.
For more information on code snippets in general, refer to Creating snippets.
Use the code snippet to add pages
With the code snippet in place, you can quickly create templates for the Home, About, and Contact pages.
-
In the
templatesfolder, create a new file namedhome.html. Then start typingflextto see the snippet appear as a completion: [Flask tutorial: autocompletion for the flextlayout code snippet]
When you select the completion, the snippet's code appears with the cursor on the snippet's insertion point:
-
At the insertion point in the "title" block, write
Home, and in the "content" block, write<p>Home page for the Visual Studio Code Flask tutorial.</p>, then save the file. These lines are the only unique parts of the extended page template: -
In the
templatesfolder, createabout.html, use the snippet to insert the boilerplate markup, insertAbout usand<p>About page for the Visual Studio Code Flask tutorial.</p>in the "title" and "content" blocks, respectively, then save the file. -
Repeat the previous step to create
templates/contact.htmlusingContact usand<p>Contact page for the Visual Studio Code Flask tutorial.</p>in the two content blocks. -
In
app.py, add functions for the /about/ and /contact/ routes that refer to their respective page templates. Also modify thehomefunction to use thehome.htmltemplate.from flask import Flask from flask import render_template from datetime import datetime from . import app @app.route("/") def home(): return render_template("home.html") @app.route("/about/") def about(): return render_template("about.html") @app.route("/contact/") def contact(): return render_template("contact.html") @app.route("/hello/") @app.route("/hello/<name>") def hello_there(name = None): return render_template( "hello_there.html", name=name, date=datetime.now() ) @app.route("/api/data") def get_data(): return app.send_static_file("data.json") -
In the
hello_appfolder, create a file__init__.pywith the following contents:# Entry point for the application. from . import app # For application discovery by the 'flask' command. from . import views # For import side-effects of setting up routes. -
Open the debug configuration file
launch.jsonand update theenvproperty as follows to point to the startup object:
Web Proxy Viewer | New URL | Original Page