


Documentation
Topics Overview Overview Agents Quickstart Editor Tutorial Intro Videos Overview Get started Agents Quickstart Agents Tutorial Best Practices Concepts Agents Agent Harnesses Language Models Context Tools Sessions & Handoff Agent Host Architecture Customization Workspace Context Trust & Safety Run agents Agents Window Chat View Choose an Agent Harness Use Tools Browser Tools Approvals & Permissions Review & Revert Changes Artifacts Remote Agent Sessions Plan Work Memory Subagents Sessions Manage Sessions Session History AI Security Customize agents Create and Manage Instructions Agent Skills Custom Agents Language Models MCP Hooks Plugins Tools Prompt Files Use chat Chat Basics Inline & Quick Chat Add Prompt Context Tutorials & guides Customize AI Context Engineering Test-Driven Development Test with AI Test Web Apps with Browser Tools Debug with AI Edit Notebooks with AI Optimize AI Credit Usage MCP Dev Guide Prompt Examples Reference Cheat Sheet Settings Reference MCP Configuration Hooks Reference OpenTelemetry Monitoring Troubleshooting Troubleshooting Debug Chat Interactions Diagnose Prompt Caching FAQ Editor Overview Quickstart Repositories & Remotes Staging & Committing Source Control History Branches & Worktrees Merge Conflicts Collaborate on GitHub Troubleshooting FAQ Get Started Terminal Basics Terminal Profiles Shell Integration Appearance Advanced Debugging Debug Configuration Tasks Testing Integrated Browser Port Forwarding Guides & Tutorials Test-Driven Development Test Web Apps with Browser Tools Overview Enterprise Policies AI Settings Extensions Telemetry Updates Overview VS Code for the Web SSH SSH Tutorial Tunnels Dev Containers WSL WSL Tutorial GitHub Codespaces VS Code Server Linux Prerequisites Tips and Tricks FAQ GitHub Copilot Setup Linux macOS Windows Raspberry Pi Network Portable Mode Additional Components Uninstall Languages & Runtimes Extension DocsOn this page there are 10 sections
Work with GitHub in VS Code
Visual Studio Code provides several ways to work with repositories, pull requests, and issues on GitHub. Basic GitHub authentication and Git operations are built into VS Code. Extensions add pull request, issue, and virtual repository workflows.
This article helps you choose the right GitHub integration and use it without leaving VS Code.
If you're new to source control or want to learn more about VS Code's basic Git support, you can start with the Source Control topic.
Choose a GitHub workflow
Choose an integration based on what you want to do:
| Goal | Capability | Requirement |
|---|---|---|
| Clone, fetch, pull, and push a repository | Built-in Git support | Install Git and sign in to GitHub when prompted. |
| Create and review pull requests or manage issues | GitHub Pull Requests and Issues extension | Install the extension and sign in to GitHub. |
| Browse and edit a repository without cloning it | GitHub Repositories extension | Install the extension and sign in to GitHub. |
The GitHub Pull Requests and Issues and GitHub Repositories extensions are separate. Install only the extension that supports your workflow.
Prerequisites
For local GitHub repositories, install Git version 2.0.0 or later and create a GitHub account.
When you commit changes, Git uses your configured username and email. Set these values with:
Pull requests
From the Pull Requests view you can view, manage, and create pull requests.
 [Screenshot showing the Pull Request view.]
The queries used to display pull requests can be configured with the GitHub Pull Requests: Queries ( githubPullRequests.queries ) setting and use the GitHub search syntax.
Working on issues
From the Issues view, you can see your issues and work on them.
 [Screenshot showing an issue and its details in the Issues view.]
By default, when you start working on an issue (Start Working on Issue context menu item), a branch will be created for you, as shown in the Status Bar in the image below.
 [Screenshot showing an active issue and its branch in the Status Bar.]
The Status Bar also shows the active issue and if you select that item, a list of issue actions are available such as opening the issue on the GitHub website or creating a pull request.
 [Screenshot showing actions for the active issue in the Status Bar.]
You can configure the name of the branch using the GitHub Issues: Issue Branch Title ( githubIssues.issueBranchTitle ) setting. If your workflow doesn't involve creating a branch, or if you want to be prompted to enter a branch name every time, you can skip that step by turning off the GitHub Issues: Use Branch For Issues ( githubIssues.useBranchForIssues ) setting.
Learn more about working with branches to understand branch management, switching between branches, and organizing your development work.
Once you are done working on the issue and want to commit a change, the commit message input box in the Source Control view will be populated with a message, which can be configured with GitHub Issues: Working Issue Format SCM ( githubIssues.workingIssueFormatScm ).
GitHub Repositories extension
The GitHub Repositories extension lets you browse, search, edit, and commit to a remote GitHub repository without cloning it locally. Use this workflow to review source code or make a small change to a file.
 [Screenshot showing a remote repository opened with the GitHub Repositories extension.]
Opening a repository
After you install the GitHub Repositories extension, open a repository with the GitHub Repositories: Open Repository... command from the Command Palette (P (Windows, Linux Ctrl+Shift+P)) or by selecting the Remote indicator in the lower-left corner of the Status Bar.
 [Screenshot showing the Remote indicator in the Status Bar.]
When you run the Open Repository command, you then choose whether to open a repository from GitHub, open a Pull Request from GitHub, or reopen a repository that you had previously connected to.
If you haven't logged into GitHub from VS Code before, you'll be prompted to authenticate with your GitHub account.
 [Screenshot showing the repository picker for the GitHub Repositories extension.]
You can provide the repository URL directly or search GitHub for the repository you want by typing in the text box.
After you select a repository or pull request, VS Code reloads the window and shows the repository contents in the Explorer view. You can open files with syntax highlighting and bracket matching, make edits, and commit changes as you would in a local clone.
One difference from working with a local repository is that when you commit a change with the GitHub Repository extension, the changes are pushed directly to the remote repository, similar to if you were working in the GitHub web interface.
Another feature of the GitHub Repositories extension is that every time you open a repository or branch, you get the up-to-date sources available from GitHub. You don't need to remember to pull to refresh as you would with a local repository.
The GitHub Repositories extension supports viewing and even committing LFS-tracked files without needing to install Git LFS (Large File System) locally. Add the file types you want tracked with LFS to a .gitattributes file, then commit your changes directly to GitHub using the Source Control view.
Switching branches
Select the branch indicator in the Status Bar to switch branches. You don't need to stash uncommitted changes first because the extension remembers your changes and reapplies them when you return to the branch.
 [Screenshot showing the branch indicator in the Status Bar.]
Remote Explorer
You can quickly reopen remote repositories with the Remote Explorer available on the Activity bar. This view shows you the previously opened repositories and branches.
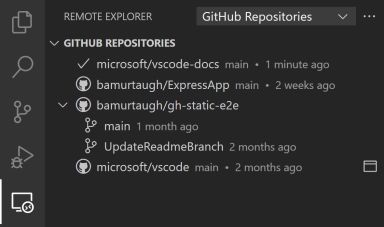 [Screenshot showing remote GitHub repositories in Remote Explorer.]
Create pull requests
If your workflow uses Pull Requests, rather than direct commits to a repository, you can create a new PR from the Source Control view. You'll be prompted to provide a title and create a new branch.
 [Screenshot showing the Create Pull Request button in the Source Control view.]
Once you have created a Pull Request, you can use the GitHub Pull Request and Issues extension to review, edit, and merge your PR as described earlier in this topic.
Virtual file system
Without a repository's files on your local machine, the GitHub Repositories extension creates a virtual file system in memory so you can view file contents and make edits. Using a virtual file system means that some operations and extensions which assume local files are not enabled or have limited functionality. Features such as tasks, debugging, and integrated terminals are not enabled and you can learn about the level of support for the virtual file system via the features are not available link in the Remote indicator hover.
 [Screenshot showing unavailable virtual workspace features in the Remote indicator hover.]
Extension authors can learn more about running in a virtual file system and workspace in the Virtual Workspaces extension author's guide.
Continue working on
Sometimes you'll want to switch to working on a repository in a development environment with support for a local file system and full language and development tooling. The GitHub Repositories extension makes it easy for you to:
- Create a GitHub codespace (if you have the GitHub Codespaces extension).
- Clone the repository locally.
- Clone the repository into a Docker container (if you have Docker and the Microsoft Container Tools extension installed).
To switch development environments, use the Continue Working On command from the Command Palette (P (Windows, Linux Ctrl+Shift+P)) or select the Remote indicator in the Status Bar.
 [Screenshot showing development environment options for the Continue Working On command.]
If you are using the browser-based editor, the Continue Working On command has the options to open the repository locally or within a cloud-hosted environment in GitHub Codespaces.
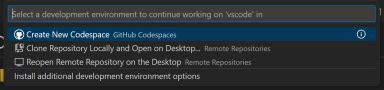 [Screenshot showing Continue Working On options in the browser-based editor.]
The first time that you use Continue Working On with uncommitted changes, you will have the option to bring your edits to your selected development environment using Cloud Changes, which stores your pending changes on the same VS Code service used for Settings Sync.
These changes are deleted from our service once they are applied to your target development environment. If you choose to continue without your uncommitted changes, you can always change this preference later by configuring the setting "workbench.cloudChanges.continueOn": "prompt".
In the event that your pending changes are not automatically applied to your target development environment, you can view, manage, and delete your stored changes using the Cloud Changes: Show Cloud Changes command.
Next steps
- Repositories and Remotes - Clone, publish, and synchronize repositories
- Branches and Worktrees - Manage branches for pull request workflows
- Source Control History - Inspect commits and file history
- AI in VS Code - Learn about AI features in VS Code


![[]](https://code.visualstudio.com/assets/icons/search-dark.svg)
![[]](https://code.visualstudio.com/assets/icons/search.svg)
![[Switch to the dark theme]](https://code.visualstudio.com/assets/icons/theme-light.svg)
![[Switch to the light theme]](https://code.visualstudio.com/assets/icons/theme-dark.svg)
![[Screenshot showing the Pull Request view.]](https://code.visualstudio.com/assets/docs/sourcecontrol/github/pull-request-view.png)
![[Screenshot showing an issue and its details in the Issues view.]](https://code.visualstudio.com/assets/docs/sourcecontrol/github/issues-view.png)
![[Screenshot showing an active issue and its branch in the Status Bar.]](https://code.visualstudio.com/assets/docs/sourcecontrol/github/working-on-issue.png)
![[Screenshot showing actions for the active issue in the Status Bar.]](https://code.visualstudio.com/assets/docs/sourcecontrol/github/issue-status-bar-actions.png)
![[Screenshot showing a remote repository opened with the GitHub Repositories extension.]](https://code.visualstudio.com/assets/docs/sourcecontrol/github/github-repositories-extension.png)
![[Screenshot showing the Remote indicator in the Status Bar.]](https://code.visualstudio.com/assets/docs/sourcecontrol/github/remote-indicator.png)
![[Screenshot showing the repository picker for the GitHub Repositories extension.]](https://code.visualstudio.com/assets/docs/sourcecontrol/github/open-github-repository-dropdown.png)
![[Screenshot showing the branch indicator in the Status Bar.]](https://code.visualstudio.com/assets/docs/sourcecontrol/github/branch-indicator-status-bar.png)
![[Screenshot showing remote GitHub repositories in Remote Explorer.]](https://code.visualstudio.com/assets/docs/sourcecontrol/github/github-remote-explorer.png)
![[Screenshot showing the Create Pull Request button in the Source Control view.]](https://code.visualstudio.com/assets/docs/sourcecontrol/github/github-repositories-create-pull-request.png)
![[Screenshot showing unavailable virtual workspace features in the Remote indicator hover.]](https://code.visualstudio.com/assets/docs/sourcecontrol/github/features-not-available-hover.png)
![[Screenshot showing development environment options for the Continue Working On command.]](https://code.visualstudio.com/assets/docs/sourcecontrol/github/continue-working.png)
![[Screenshot showing Continue Working On options in the browser-based editor.]](https://code.visualstudio.com/assets/docs/sourcecontrol/github/codespaces-continue.png)
![[VS Code on Github]](https://code.visualstudio.com/assets/icons/github-icon.svg)
![[Follow us on X]](https://code.visualstudio.com/assets/icons/x-icon.svg)
![[VS Code on LinkedIn]](https://code.visualstudio.com/assets/icons/linkedin-icon.svg)
![[VS Code on Bluesky]](https://code.visualstudio.com/assets/icons/bluesky-icon.svg)
![[Join the VS Code community on Reddit]](https://code.visualstudio.com/assets/icons/reddit-icon.svg)
![[The VS Code Insiders Podcast]](https://code.visualstudio.com/assets/icons/podcast-icon.svg)
![[VS Code on TikTok]](https://code.visualstudio.com/assets/icons/tiktok-icon.svg)
![[VS Code on YouTube]](https://code.visualstudio.com/assets/icons/youtube-icon.svg)
![[Microsoft homepage]](https://code.visualstudio.com/assets/icons/microsoft.svg)