
![[logo.BV31tBX8.svg]](https://docs.patchstack.com/_astro/logo.BV31tBX8.svg)
Multisite installation
You can set up Patchstack on each of your network sites as easily as you would set it up on regular WordPress sites. Keep in mind that each site must be added to the Patchstack App individually and will take up a slot on your account. Every subsite of your multisite network will have an individual API key which has to be inserted correctly.
Here are the steps to take to install Patchstack on your multisite network.
Step #1 Adding the site to Patchstack App
Section titled Step #1 Adding the site to Patchstack AppTo install Patchstack on the multisite network, the easiest way is to do it via the Patchstack App.
- Navigate to Sites on the Patchstack App and click on + Add new (at the top bar).
- Type in your domain and click Continue to plugin sync
- You are then shown a popup like this:
 [patchstack-checking-sync-status.B2pvKK_Z_sNzbv.webp]
 - Click on Or sync manually link and copy the API key
![[patchstack-checking-sync-status.B2pvKK_Z_sNzbv.webp]](https://docs.patchstack.com/_astro/patchstack-checking-sync-status.B2pvKK_Z_sNzbv.webp)
Step #2 Install the plugin
Section titled Step #2 Install the plugin- Go to your WordPress Network Admin and navigate to Plugins > Add New Plugin
- Search for Patchstack
- Install the Patchstack WordPress & Plugins Security plugin
- Once the plugin is installed, click Activate
- You will then see screen as such:
 [patchstack-multisite-installation-screen.CRONLyPu_Z2mLtOY.webp]
 - Click on the last link in this box, then paste the API key to that field, and click Sync
- Your main site is now connected and synchronized with Patchstack
- You should see a success screen in Patchstack App and in your plugin as well
![[patchstack-multisite-installation-screen.CRONLyPu_Z2mLtOY.webp]](https://docs.patchstack.com/_astro/patchstack-multisite-installation-screen.CRONLyPu_Z2mLtOY.webp)
Step #3 - Connecting the subsites
Section titled Step #3 - Connecting the subsitesTo connect the subsites, repeat the process in step 1 - add your site to Patchstack App, and then get the plugin API key.
- In your Network Admin, navigate to Patchstack > Sites
- Youll see screen as such:
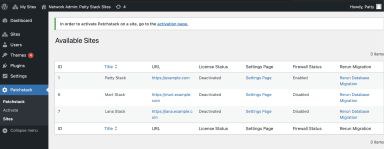 [patchstack-multisite-plugin-settings.BEMD5fMp_GG22v.webp]
 - To add an API key to the corresponding site, click Settings page and add the API key the same way as you did for the main site
![[patchstack-multisite-plugin-settings.BEMD5fMp_GG22v.webp]](https://docs.patchstack.com/_astro/patchstack-multisite-plugin-settings.BEMD5fMp_GG22v.webp)
Rerunning the database migration
Section titled Rerunning the database migrationIn some certain scenarios, you may encounter database errors on your error logs about Patchstack database tables, when running the multisite environment. For that, you will need to rerun the database migrations.
This can be done when you navigate to: Network Admin > Patchstack > Sites and click on Rerun Database Migration from there for your sites.
Conclusion
Section titled ConclusionYou will have to add every subsite separately to the Patchstack App and insert the plugin API keys to every subsite.
After adding a site successfully, youll see stats of your site on your WordPress admin.
 [patchstack-plugin-connected.jPPRgIQ3_2dJqlC.webp]
![[patchstack-plugin-connected.jPPRgIQ3_2dJqlC.webp]](https://docs.patchstack.com/_astro/patchstack-plugin-connected.jPPRgIQ3_2dJqlC.webp)
If you need further help, dont hesitate to reach out to us via live chat at the bottom right corner!