


By using VS Code, you agree to its license and privacy statement. By using VS Code, you agree to License & Privacy.
Documentation
Topics Overview Download and Install Get to Know VS Code Agents Quickstart Editor Tutorial Intro Videos Overview Get Started Find a Guide Choose an AI Feature Set Up GitHub Copilot Agents Quickstart Agents Tutorial Best Practices Work with AI Inline Suggestions Smart Actions Chat View and Layout Agents Window Inline Chat & Quick Chat Chat Interactions Canvases Add Prompt Context Review & Revert Changes Configure the Agents Window Plan and Run Tasks Plan Work Use Tools Browser Tools Subagents Automations Sessions Manage Sessions Organize & Triage Sessions Memory Artifacts Permissions and Security Approvals & Permissions Agent Sandboxing AI Security Choose Models and Agents Choose and Configure Models Choose an Agent Harness Move from Local to Copilot Compare Model Results Customize and Extend Overview Plugins Agent Skills Instructions Custom Agents Copilot Connectors Add and Use MCP Servers Manage MCP Servers Hooks Prompt Files Migrate Existing Customizations Work Across Apps and Machines Cloud Continuity Tutorial Remote Agent Sessions Cloud Sessions Session History Tutorials & Guides Find a Guide Explore a Codebase Add a Feature Fix a Bug Refactor Safely Add Tests Test Web Apps Run Parallel Tasks Get Back on Track Adapt Agents to Your Project Context Engineering Test-Driven Development Jupyter Notebooks Reduce Credit Usage Prompt Examples Concepts Agents How Models Work Context Tools Sessions and Chats Trust & Safety Agent Harnesses Agent Customization Reference and HelpReference Cheat Sheet Tools and Context Workspace Context Settings Reference VS Code Pet Custom Agent File Reference Custom Instructions Reference Agent Plugin Authoring Reference MCP Configuration Hooks Reference OpenTelemetry Monitoring Agent Host Architecture Troubleshooting Troubleshooting Debug Chat Interactions Diagnose Prompt Caching FAQ Overview Getting Started Editor Tutorial User Interface Tips and Tricks Write code Basic Editing IntelliSense Inline Suggestions Smart Actions Code Navigation Refactoring Snippets Workspaces Overview Multi-Root Workspaces Workspace Trust Configure the editor Display Language Layout Keyboard Shortcuts Settings Settings Sync Extensions Overview Extension Marketplace Extension Runtime Security Themes Profiles Accessibility Overview Voice Interactions Command Line Interface Telemetry Reference Default Keyboard Shortcuts Default Settings Substitution Variables Tasks Schema Overview Quickstart Repositories & Remotes Staging, Commits & Undo History & Blame Branches, Stashes & Worktrees Merge Conflicts Collaborate on GitHub Troubleshooting FAQ Get Started Terminal Basics Terminal Profiles Shell Integration Appearance Advanced Debugging Debug Configuration Tasks Testing Integrated Browser Port Forwarding Guides & Tutorials Test-Driven Development Test Web Apps Overview Enterprise Policies Manage AI Settings Extensions Telemetry Updates Overview VS Code for the Web SSH SSH Tutorial Tunnels Dev Containers WSL WSL Tutorial GitHub Codespaces VS Code Server Linux Prerequisites Tips and Tricks FAQ GitHub Copilot Setup Linux macOS Windows Raspberry Pi Network Portable Mode Additional Components Uninstall Languages & Runtimes Extension DocsOn this page there are 15 sections
Related
User interface
At its heart, Visual Studio Code is a code editor. Like many other code editors, VS Code adopts a common user interface and layout of an explorer on the left, showing all of the files and folders you have access to, and an editor on the right, showing the content of the files you have opened.
 [Watch Transform your VS Code user interface on YouTube (opens in new tab).]
Basic layout
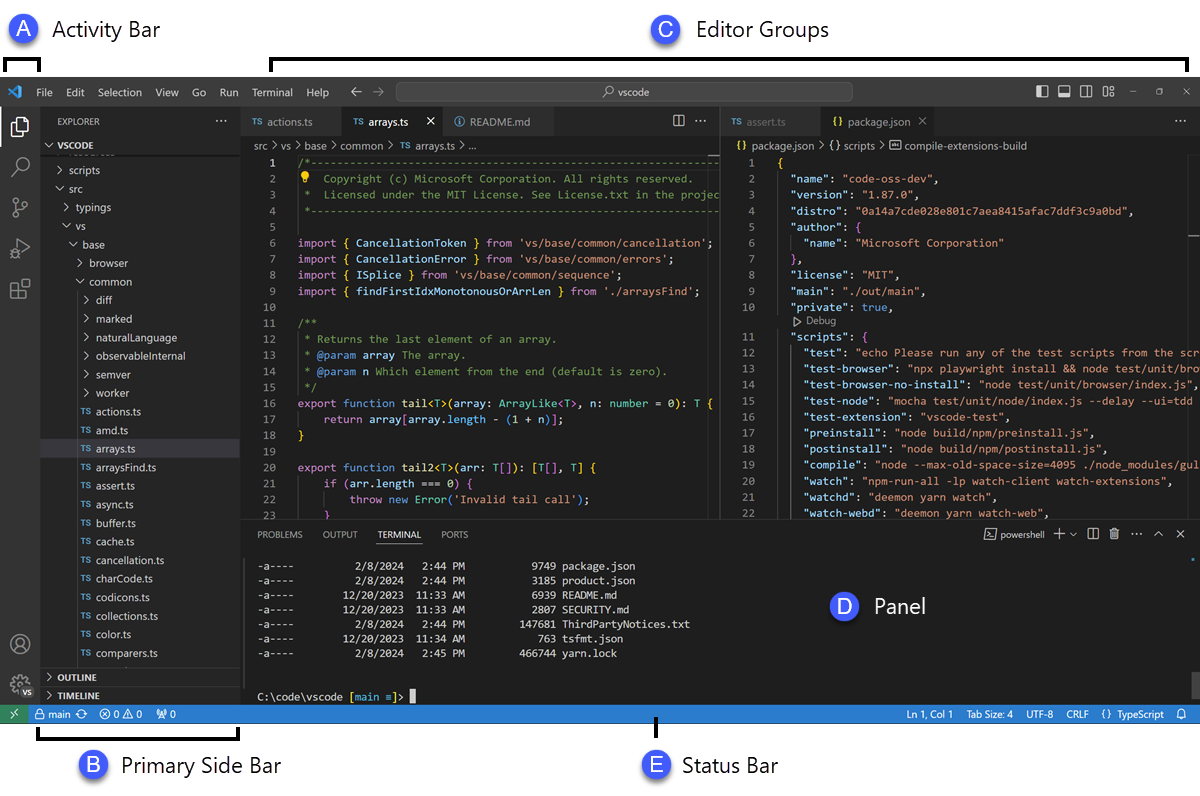
VS Code comes with a simple and intuitive layout that maximizes the space provided for the editor, while leaving ample room to browse and access the full context of your folder or project. The user interface is divided into six main areas:
- Editor - The main area to edit your files. You can open as many editors as you like side by side vertically and horizontally.
- Primary Side Bar - Contains different views like the Explorer to assist you while working on your project.
- Secondary Side Bar - Opposite the Primary Side Bar. By default, contains the Chat view. Drag and drop views from the Primary Side Bar to the Secondary Side Bar to move them.
- Status Bar - Information about the opened project and the files you edit.
- Activity Bar - Located on the far left-hand side. Lets you switch between views and gives you additional context-specific indicators, like the number of outgoing changes when Git is enabled. You can change the position of the Activity Bar by right-clicking it to open a context menu.
- Panel - An additional space for views below the editor region. By default, it contains output, debug information, errors and warnings, and an integrated terminal. The Panel can also be moved to the left or right for more vertical space.
 [Screenshot of the VS Code user interface, highlighting the main areas.]
Each time you start VS Code, it opens up in the same state it was in when you last closed it. The folder, layout, and opened files are preserved.
Open files in each editor are displayed with tabbed headers (Tabs) at the top of the editor region. To learn more about tabbed headers, see the Tabs section.
You can move the Primary Side Bar to the right hand side by right-clicking the Activity Bar and selecting Move Primary Side Bar Right or toggle its visibility (B (Windows, Linux Ctrl+B)).
Learn more about using Primary and Secondary Side Bar.
Side by side editing
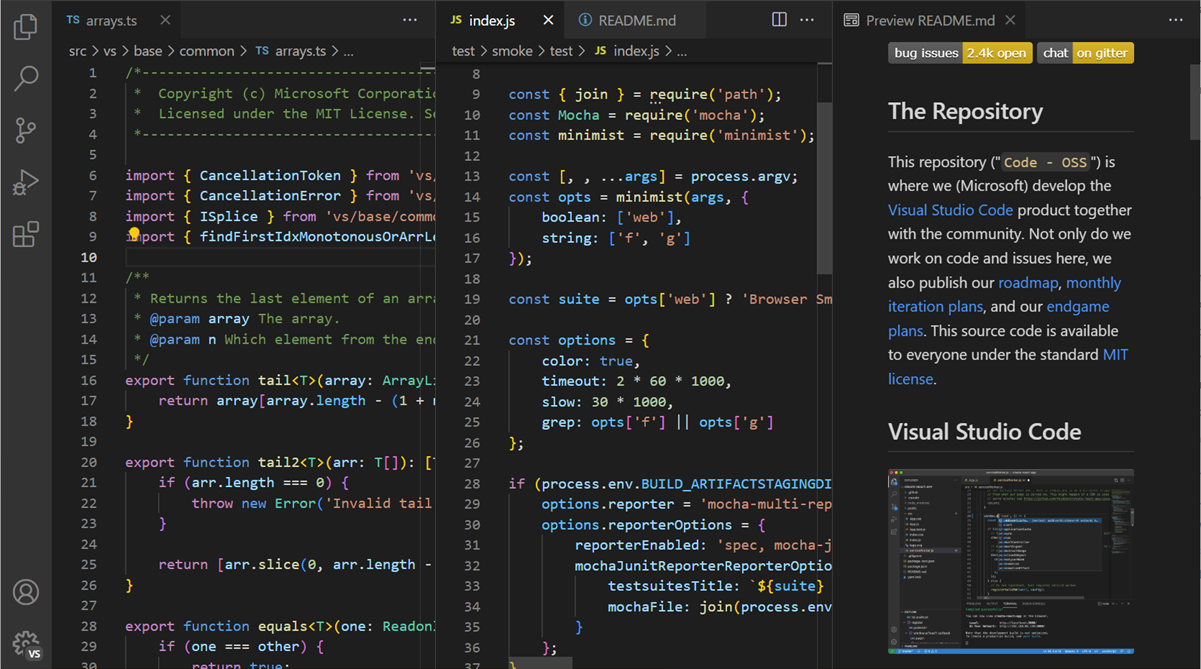
You can open as many editors as you like side by side vertically and horizontally. If you already have an editor open, there are multiple ways of opening another editor to the side:
- Alt and select a file in the Explorer view.
- \ (Windows, Linux Ctrl+\) to split the active editor into two.
- Open to the Side (Enter (Windows, Linux Ctrl+Enter)) from the Explorer context menu on a file.
- Select the Split Editor button in the upper right of an editor.
- Drag and drop a file to any side of the editor region. Hold Ctrl (Option on macOS) while dragging to copy the tab instead of moving it.
- Press Enter (Windows, Linux Ctrl+Enter) in the Quick Open (P (Windows, Linux Ctrl+P)) file list.

When you open another file, the editor that is active will display the content of that file. If you have two editors side by side and you want to open file 'foo.cs' into the right-hand editor, make sure that this editor is active (by clicking inside it) before opening file 'foo.cs'.
By default, editors open to the right-hand side of the active one. You can change this behavior with the workbench.editor.openSideBySideDirection setting to open new editors to the bottom of the active one instead.
When you have more than one editor open, you can switch between them quickly by holding the Ctrl key (Cmd on macOS) and pressing 1, 2, or 3.
You can resize editors and reorder them. Drag and drop the editor title area to reposition or resize the editor.
Editor groups
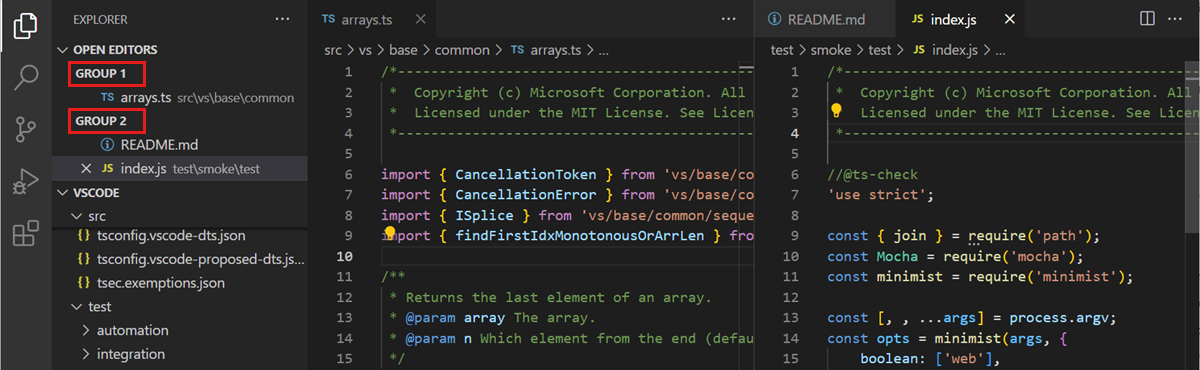
When you split an editor (using the Split Editor or Open to the Side commands), a new editor region (edit group) is created which can hold a group of items. You can open as many editor groups as you like side by side vertically and horizontally.
You can see these clearly in the Open Editors section at the top of the Explorer view (toggle ... > Open Editors in the Explorer view).

You can drag and drop editor groups on the workbench, move individual tabs between groups, and quickly close entire groups (Close All).
VS Code uses editor groups whether or not you have enabled tabs. Without tabs, editor groups are a stack of your open items with the most recently selected item visible in the editor pane.
Split in group
You can split the current editor without creating a new editor group with the View: Split Editor in Group command (K \ (Windows, Linux Ctrl+K Ctrl+Shift+\)). To learn more about this editor mode and specific commands for navigating between the two sides, you can read the section in the Custom Layout article.
Floating windows
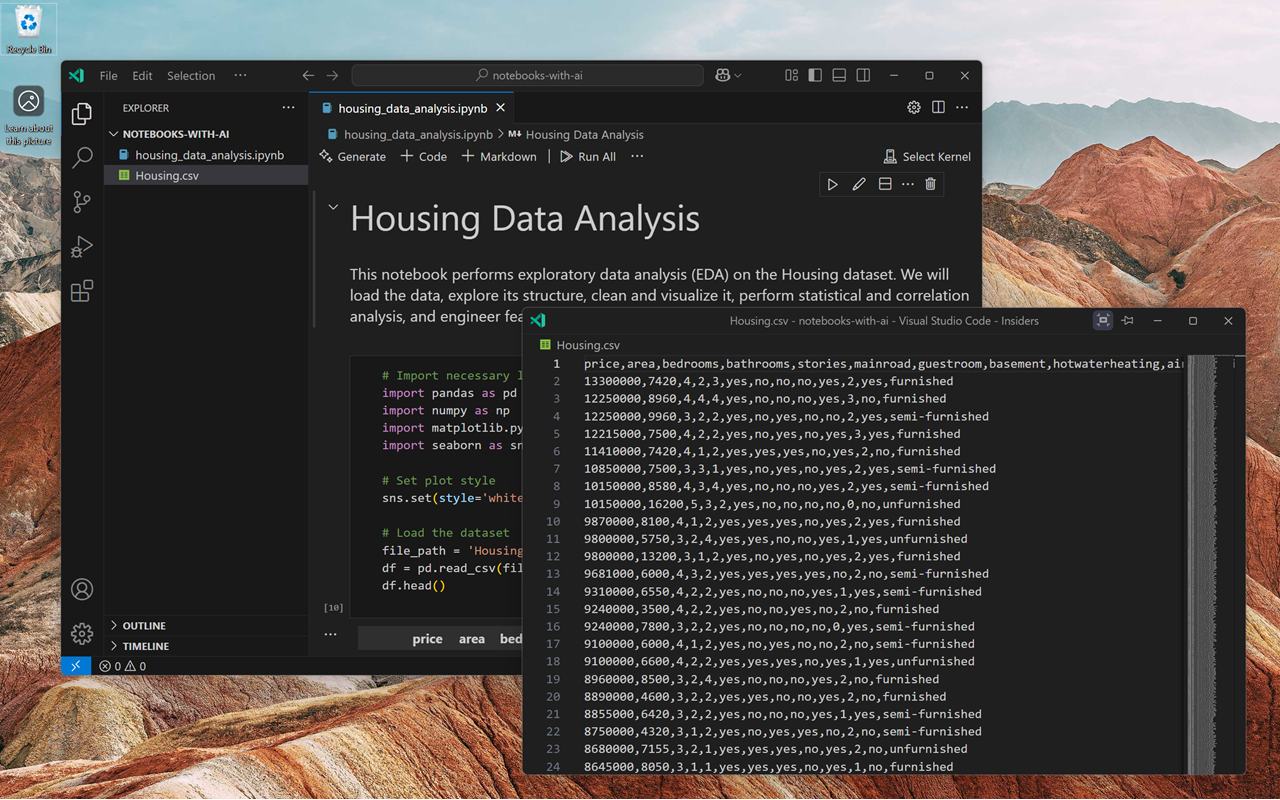
You can move editors, the terminal, or specific views into their own floating windows. This is useful if you have a multi-monitor setup and want to keep a file open on a different monitor.

Drag an editor tab out of the current VS Code window to open it in a floating window. Alternatively, use the Move into New Window or Copy into New Window context options from the editor tab.
To pin a floating window to the top of the screen, select the Set Always on Top option (pin icon) from its title bar.
To learn more about floating windows, read the section in the Custom Layout article.
Modal editors
Certain configuration editors in VS Code open in a centered modal overlay on top of the editor area, rather than as a regular editor tab. These modal editors include:
- Settings editor
- Keyboard Shortcuts editor
- Profiles editor
- Workspace Trust editor
- Language Models editor
- Extensions editor
You can dismiss a modal editor by clicking outside of it, pressing Escape, or selecting the close button. You can also maximize it to fill the editor area, or move it back into the main window as a regular editor tab.
You can control this behavior with the
workbench.editor.useModal
setting. Set it to off to always open editors as regular tabs, some to open only configuration editors as modal overlays (default), or all to open all editors in a modal overlay.
Minimap
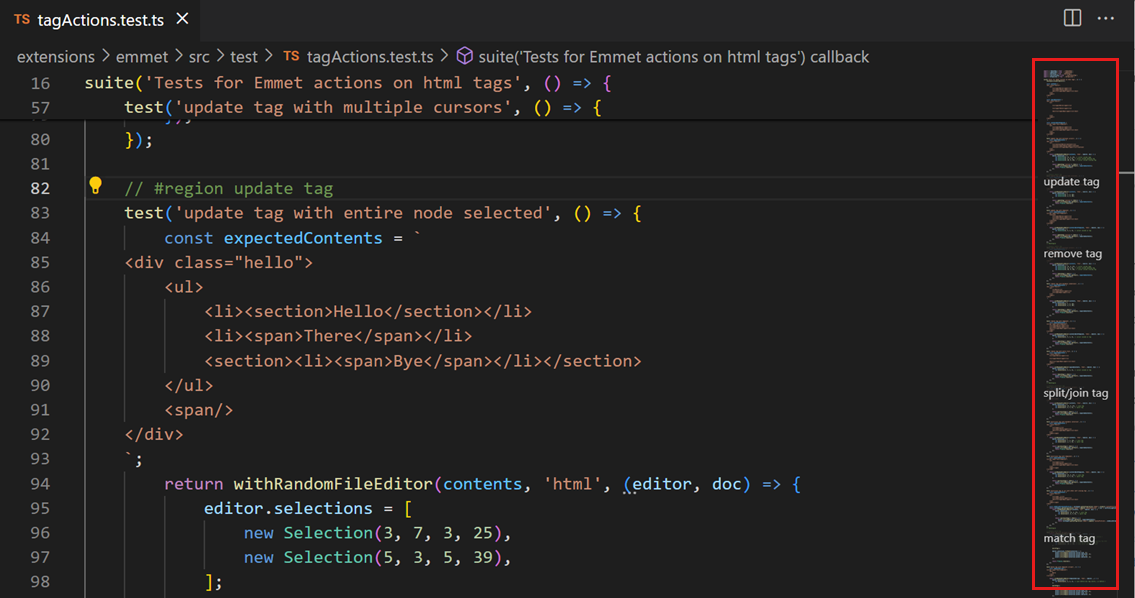
A Minimap (code outline) gives you a high-level overview of your source code, which is useful for quick navigation and code understanding. A file's minimap is shown on the right side of the editor. You can select or drag the shaded area to quickly jump to different sections in your file.
If you have folding markers in the editor, such as //#region comments, then the minimap shows the folding marker names. Folding markers are language-specific, so check which markers apply to your language.

You can move the minimap to the left hand side or disable it completely by respectively setting "editor.minimap.side": "left" or "editor.minimap.enabled": false in the user or workspace settings.
Sticky Scroll
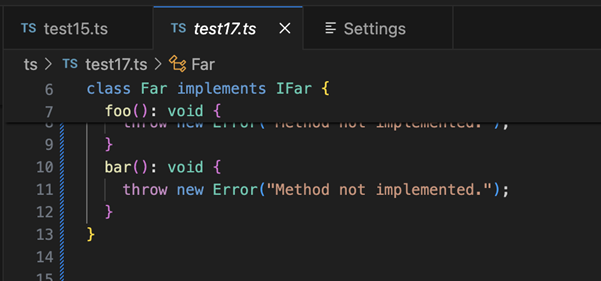
Sticky Scroll shows the starting lines of currently visible nested scopes at the top of the editor. It facilitates navigation by indicating where you are in a file and lets you quickly jump back to the top of the current scope.

You can enable/disable Sticky Scroll with the editor.stickyScroll.enabled setting.
Sticky Scroll uses several different content models to create its headings. It is possible to choose between the outline provider model, the folding provider model, and the indentation model to determine which lines to display in the Sticky Scroll area. If a model is not available for the current language, VS Code falls back to the next model in the order given above. The default model initially used comes from the editor.stickyScroll.defaultModel setting.
Indent guides
The editor shows indentation guides (vertical lines) which help you quickly see matching indent levels. If you would like to disable indent guides, you can set
editor.guides.indentation
to false in your user or workspace settings.
Breadcrumbs
The editor has a navigation bar at the top, also called breadcrumbs. Breadcrumbs always show the file path and, if the current file type has language support for symbols, the symbol path up to the cursor position. The breadcrumbs enable you to quickly navigate between folders, files, and symbols.



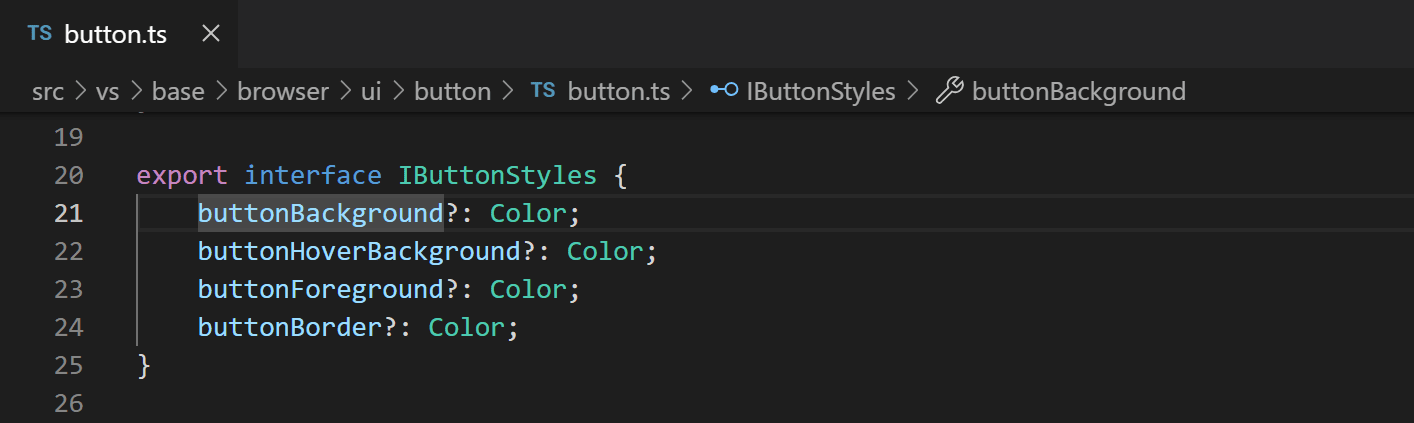
You can disable breadcrumbs with the View > Appearance > Toggle Breadcrumbs menu item or the View: Toggle Breadcrumbs command. For more information about the breadcrumbs feature, such as how to customize their appearance, see the Breadcrumbs section of the Code Navigation article.
Explorer view
The Explorer view is used to browse, open, and manage the files and folders in your project. VS Code is file and folder based and you can get started immediately by opening a file or folder in VS Code.
After you open a folder in VS Code, the contents of the folder are shown in the Explorer view. You can do many things from here:
- Create, delete, and rename files and folders.
- Move files and folders with drag and drop.
- Use the context menu to explore all options.
You can drag and drop files into the Explorer view from outside VS Code to copy them. If the explorer is empty, VS Code opens the files instead. You can also copy-paste files from outside VS Code into the Explorer view. With the explorer.autoOpenDroppedFile setting, you to configure whether to automatically open the file or not.
VS Code works well with other tools that you might use, especially command-line tools. If you want to run a command-line tool in the context of the folder you currently have open in VS Code, right-click the folder and select Open in Integrated Terminal.
You can also navigate to the location of a file or folder in the native operating system file explorer by right-clicking on a file or folder and selecting Reveal in File Explorer on Windows, Reveal in Finder on macOS, or Open Containing Folder on Linux.
Type P (Windows, Linux Ctrl+P) (Quick Open) to quickly search and open a file by its name.
By default, VS Code excludes some folders from showing in the Explorer view, such as .git. Use the
files.exclude
setting to configure rules for hiding files and folders from the Explorer view. Glob patterns in this setting follow your operating system's case sensitivity rules (case-insensitive on Windows/macOS, case-sensitive on Linux). Learn more about glob patterns.
You can also hide files and folders that are specified in your .gitignore files by enabling the
explorer.excludeGitIgnore
setting. When enabled, .gitignore patterns are applied with case-insensitive matching on Windows and macOS, and case-sensitive matching on Linux. For example, a pattern like node_modules in your .gitignore will match node_modules/, Node_Modules/, NODE_MODULES/, and other case variations on Windows and macOS, but only exact matches on Linux.
To show selected files or folders inside an excluded folder, add a ! exception to
files.exclude
in your settings.json file. For example, hide node_modules but keep node_modules/@types visible:
Nesting patterns support the following tokens:
${capture}: Matches whatever string was matched by the*wildcard in the pattern key.${basename}: Matches the parent file's basename (the filename without extension).${extname}: Matches the parent file's extension.${dirname}: Matches the parent file's directory name.
When a nest is collapsed, file operations like copy, cut, drag and drop, and delete apply to the entire nested group as a single unit. When the nest is expanded, selections and operations apply to individual files.
Multi-selection
You can select multiple files in the Explorer view and Open Editors section to run actions (delete, drag and drop, or open to the side) on multiple items. Hold Ctrl (Cmd on macOS) and select individual files, or hold Shift to select a range of files. If you select two items, you can now also use the context menu Compare Selected command to quickly diff two files.
In earlier VS Code releases, clicking with the Ctrl (Cmd on macOS) key pressed, would open a file in a new editor group to the side. If you still want this behavior, you can use the workbench.list.multiSelectModifier setting to change multi-selection to use the Alt key.
See the section below to optimize VS Code for working without Tabs.
Double-click in the editor title area to quickly create a new tab.
Tab ordering
By default, new tabs are added to the right of the existing tabs. You can control where you want new tabs to appear with the workbench.editor.openPositioning setting.
For example, you might like new tabbed items to appear on the left:
You can specify one or more naming patterns for the tab display labels with the workbench.editor.customLabels.patterns setting. A name pattern consists of two components:
- Item - a glob pattern that matches file paths for which to apply a custom label. For example,
**/static/**/*.html. - Value - a template for the custom label. Templates can use variables such as
${filename},${extname},${extname(N)},${dirname}, and${dirname(N)}, which are dynamically replaced with values from the file's path.
The following sample displays the /src/orders/index.html file with a tab label of orders/index.
Close an entire group instead of a single editor
If you liked the behavior of VS Code closing an entire group when closing one editor, you can bind the following in your keybindings.
macOS:
{ "key": "ctrl+w", "command": "workbench.action.closeEditorsInGroup" }
Window management
VS Code has various options to control how VS Code windows (instances) should be opened or restored between sessions.
The settings
window.openFoldersInNewWindow
and
window.openFilesInNewWindow
are provided to configure opening new windows or reusing the last active window for files or folders and possible values are default, on and off.
If configured to be default, VS Code decides about reusing or opening a new window, based on the context from where the open request was made. Flip this to on or off to always behave the same. For example, if you feel that picking a file or folder from the File menu should always open in a new window, set this to on.
There are cases where this setting is ignored, such as when you use the -new-window or -reuse-window command-line option.
The
window.restoreWindows
setting informs VS Code about how to restore the opened windows of your previous session. By default, VS Code restores all windows you worked on during your previous session (setting: all). Change this setting to none to never reopen any windows and always start with an empty VS Code instance. Change it to one to reopen the last opened window you worked on, or to folders to only restore windows that had folders opened.
Next steps
Now that you know the overall layout of VS Code, start to customize the editor to how you like to work by looking at the following articles:
- Changing the theme - Set a Color and/or File Icon Theme to your preference.
- Using custom layouts - Learn more about VS Code's workbench and editor layout customizations.
Common questions
How can I change the color of the indent guides?
The indent guide colors are customizable, as are most VS Code user interface elements. To customize the indent guides color for your active Color Theme, use the
workbench.colorCustomizations
setting and modify the editorIndentGuide.background value.
For example, to make the indent guides bright blue, add the following to your settings.json:
| Web Proxy Viewer | New URL | Original Page |