Stripe integration
You will need help from your development team to pass metadata (journey, user, device) when creating Stripe Checkout Sessions. Share this guide with them.
Stripe is a payment platform that lets you accept payments and manage subscriptions. Integrating Stripe with Pushwoosh lets you track payments and subscriptions in campaigns, analyze revenue by journey and product, segment users by payment events, and use ManyMoney AI for revenue insights.
Integration overview
Anchor link toIntegration type
Anchor link toSource: Payment and subscription events are sent from Stripe to Pushwoosh.
Prerequisites
Anchor link toTo set up the Stripe integration with Pushwoosh, ensure the following:
- You have an active Pushwoosh account.
- You have a Stripe account.
Glossary (mapping entity names if they are different)
Anchor link toThe table below shows how Stripe entities map to Pushwoosh. This mapping is achieved by passing the corresponding fields as metadata when you create a Checkout Session (see Metadata configuration).
| Stripe | Pushwoosh |
|---|---|
| Customer | user_id (required), device_id (optional) in metadata |
| Payment / Charge | Event StripePaymentSucceeded (charge.succeeded) |
| Invoice (paid) | Event StripeInvoicePaid (invoice.paid) |
| Subscription | StripeSubscriptionCreated + attributes in StripeInvoicePaid |
| Product / Price | product_id, product_name in metadata and event attributes |
| Campaign (journey) | journey_uuids in metadata |
Synchronized entities
Anchor link to- Payment events (one-time payments, subscription invoices)
- Subscription events (subscription created, subscription invoice paid)
How does the integration work?
Anchor link toAfter you connect your Stripe account to Pushwoosh via Stripe Connect, Pushwoosh receives payment and subscription data from Stripe. You can link each transaction to a campaign and user or device by passing metadata when creating a Checkout Session (see Metadata configuration).
Pushwoosh creates events you can use for segmentation and analytics.
Data flow
Anchor link to- You connect your Stripe account to Pushwoosh once via Stripe Connect in Settings 3rd-party integrations.
- When creating a Checkout Session, you pass metadata so the payment can be attributed later (see Metadata configuration).
- When a payment or subscription event occurs in Stripe (e.g.
charge.succeededfor one-time,invoice.paidfor subscription), Stripe sends the data to Pushwoosh. - Pushwoosh creates the corresponding events and uses the metadata for attribution. This data appears in Finance Overview, Audience Events, and ManyMoney.
Use cases
Anchor link toTrack payments
Anchor link toAutomatically receive information about all successful payments and subscriptions.
Link payments to campaigns
Anchor link toAssociate transactions with specific customer journeys by passing metadata (see Metadata configuration).
Analyze revenue
Anchor link toView income by campaigns, products, users, and devices.
Segment your audience
Anchor link toCreate segments based on payment events.
AI analytics
Anchor link toManyMoney AI assistant automatically receives payment and subscription statistics and can make decisions based on this data.
Set up the integration
Anchor link toConnect Stripe to Pushwoosh
Anchor link to- Open any Pushwoosh application (Stripe account is linked to your entire account, not a specific application) and navigate to Settings 3rd-party integrations.
- Find the Stripe card and click the LOGIN PAGE button.
 [Settings page with 3rd-party integrations section and Stripe card with LOGIN PAGE button]
![[Settings page with 3rd-party integrations section and Stripe card with LOGIN PAGE button]](https://docs.pushwoosh.com/integrations-stripe-integration-1.webp)
- You will be redirected to the Stripe authorization page.
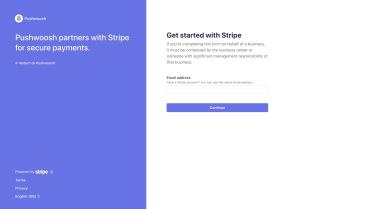 [Stripe authorization page with account selection and Connect button]
![[Stripe authorization page with account selection and Connect button]](https://docs.pushwoosh.com/integrations-stripe-integration-2.webp)
- On the Stripe page, enter your email and click Continue.
- Log in to your Stripe account (or create a new one). If you have multiple accounts, select the account you want to connect.
- Click Connect to confirm.
- After successful authorization, you will be redirected back to Pushwoosh. The integration status will change to Connected.
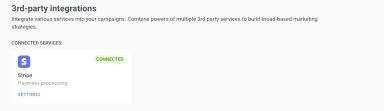 [3rd-party integrations page showing Stripe card with Connected status]
![[3rd-party integrations page showing Stripe card with Connected status]](https://docs.pushwoosh.com/integrations-stripe-integration-3.webp)
Disconnect the integration
Anchor link toMethod 1. Via Pushwoosh
Anchor link to- Go to Settings 3rd-party integrations.
- Find the Stripe card and click the SETTINGS button.
- In the popup window, click the Disconnect button.
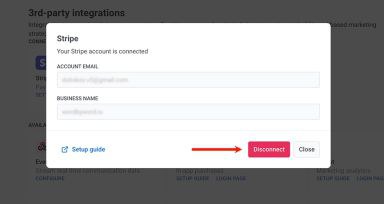 [Stripe card SETTINGS popup with Disconnect button in 3rd-party integrations]
![[Stripe card SETTINGS popup with Disconnect button in 3rd-party integrations]](https://docs.pushwoosh.com/integrations-stripe-integration-4.webp)
Method 2. Via Stripe Dashboard
Anchor link to- Log in to Stripe Dashboard.
- Go to Settings Team and security Installed apps.
- Find the application in the Connect Extensions section.
 [Stripe Dashboard Settings, Team and security, Installed apps, Connect Extensions section]
![[Stripe Dashboard Settings, Team and security, Installed apps, Connect Extensions section]](https://docs.pushwoosh.com/integrations-stripe-integration-5.webp)
When you disconnect through Stripe, Pushwoosh automatically receives a notification and removes the integration.
Metadata configuration
Anchor link toStripe sends payment events to Pushwoosh, but without extra data Pushwoosh cannot tell which campaign or which user the payment belongs to. When you pass metadata at Checkout Session creation (campaign IDs, user or device ID, product), each payment is attributed to the right journey and user.
You then see revenue by campaign in Finance Overview, build segments by payer, and use ManyMoney with correct attribution.
Available metadata fields
Anchor link to| Field | Description | Required | Example |
|---|---|---|---|
journey_uuids | Campaign (journey) IDs separated by semicolons | No | bfab4bc0-b0a5-414b-befc-4aaddc429b0e;a2bff710-6b49-44d1-96a7-3232feeca6e9 |
user_id | User identifier. Required for event collection and for device_id to be applied | Yes | user_12345 or email@example.com |
device_id | Device Hardware ID (HWID). | No | hwid_abc123 |
product_id | Product ID | No | prod_premium |
product_name | Product name | No | Premium Plan |
-
Without
user_id, events are not collected anddevice_idis ignored. For comprehensive analytics, also providejourney_uuidsanddevice_id. -
journey_uuidsis optional and can only be set via metadata. Stripe does not supply campaign or journey data, so pass it when creating the Checkout Session if you want revenue attributed to a journey. -
product_idandproduct_nameare optional. Pushwoosh uses metadata first. If either is missing in metadata, it is taken from Stripe when available. If neither source has a value, the field is not stored.
Passing metadata via Checkout Session
Anchor link toMetadata is passed when creating a Checkout Session depending on the payment type:
| Payment type | Parameter | Stripe event |
|---|---|---|
One-time payment (mode=payment) | payment_intent_data[metadata] | charge.succeeded |
Subscription (mode=subscription) | subscription_data[metadata] | invoice.paid |
Metadata priority during processing
Anchor link toFor subscriptions (invoice.paid event):
Invoice metadata if empty Subscription metadataFor one-time payments (charge.succeeded event):
Charge metadata (from payment_intent_data)Creating a checkout session via Stripe API (curl)
Anchor link toOne-time payment (mode=payment)
Anchor link tocurl https://api.stripe.com/v1/checkout/sessions \ -u sk_live_YOUR_SECRET_KEY: \ -d "mode=payment" \ -d "success_url=https://example.com/success" \ -d "cancel_url=https://example.com/cancel" \ -d "line_items[0][price]=price_1234567890" \ -d "line_items[0][quantity]=1" \ -d "payment_intent_data[metadata][journey_uuids]=bfab4bc0-b0a5-414b-befc-4aaddc429b0e" \ -d "payment_intent_data[metadata][user_id]=user_12345" \ -d "payment_intent_data[metadata][device_id]=hwid_abc123" \ -d "payment_intent_data[metadata][product_id]=prod_premium" \ -d "payment_intent_data[metadata][product_name]=Premium Plan"Subscription (mode=subscription)
Anchor link tocurl https://api.stripe.com/v1/checkout/sessions \ -u sk_live_YOUR_SECRET_KEY: \ -d "mode=subscription" \ -d "success_url=https://example.com/success" \ -d "cancel_url=https://example.com/cancel" \ -d "line_items[0][price]=price_monthly_premium" \ -d "line_items[0][quantity]=1" \ -d "subscription_data[metadata][journey_uuids]=bfab4bc0-b0a5-414b-befc-4aaddc429b0e" \ -d "subscription_data[metadata][user_id]=user_12345" \ -d "subscription_data[metadata][device_id]=hwid_abc123" \ -d "subscription_data[metadata][product_name]=Monthly Premium"View data
Anchor link toAfter successful integration, a new Finance Overview dashboard appears in the Dashboards section. There you can view Gross Revenue and New Subscriptions statistics broken down by campaigns (journey).
 [Finance Overview dashboard in Statistics with Gross Revenue and New Subscriptions by campaign]
![[Finance Overview dashboard in Statistics with Gross Revenue and New Subscriptions by campaign]](https://docs.pushwoosh.com/integrations-stripe-integration-6.webp)
For more detailed information, visit your Stripe Dashboard.
Create segments based on payments
Anchor link toUse Stripe events to create user segments:
- Open Audience Segments.
- Click Create Segment Build Segment.
- In Add filter by, click Event.
- Select a Stripe event from the dropdown (see the table below for available events).
Stripe events appear in the list after the integration is connected and payment data is received.
- Set the condition: how many times the event occurred and the time frame (e.g. during the last 30 days, between dates).
- Optionally narrow the segment by event attributes. The table below lists the attributes available for each event.
| Event | Description | Attributes |
|---|---|---|
StripePaymentSucceeded | Successful payment | __amount, __currency, invoice_id, journey_uuids, product_id, product_name, stripe_customer_id, subscription_id |
StripeInvoicePaid | Subscription invoice paid | __amount, __currency, journey_uuids, product_id, product_name, stripe_customer_id, transaction_id, transaction_type |
StripeSubscriptionCreated | Subscription created | __amount, __currency, interval, journey_uuids, product_id, product_name, status, stripe_customer_id, subscription_id |
 [Audience Segments page with Create Segment and Build Segment options]
![[Audience Segments page with Create Segment and Build Segment options]](https://docs.pushwoosh.com/integrations-stripe-integration-7.webp)
- To add more events, add another Event filter and choose an operator (AND or OR) between conditions.
Learn more about creating segments.
You can also map StripePaymentSucceeded (__amount, __currency, product_id) or StripeInvoicePaid (__amount, __currency, transaction_id, product_id) as a source for Conversion events, to bring Stripe revenue into RFM segmentation, journey attribution, and ManyMoney AI alongside your other revenue sources.
ManyMoney AI Assistant
Anchor link toAfter successful Stripe integration, the ManyMoney AI assistant automatically gains access to payment and subscription statistics.
ManyMoney is available in the Dashboard interface. After you connect Stripe, payment data is available for analysis automatically. No additional configuration is required.
What ManyMoney can do
Anchor link to- Analyze revenue: answers questions about income, conversions, and campaign effectiveness.
- Compare periods: shows payment and subscription dynamics across different time intervals.
- Identify trends: detects growing and declining products and audience segments.
- Provide recommendations: suggests optimizations based on payment data.
- What revenue did the campaign generate last month?
- Compare subscription conversion rates between January and February
- Show refund statistics