Liquid templates
Liquid templates significantly broaden Pushwooshs personalization capabilities by implementing sophisticated logic in addition to regular Dynamic Content usage.
Message personalization in Pushwoosh is based on Tags (user data). Pushwoosh offers a variety of default Tags and custom Tags. Using them, you can specify a users first name, city, purchase history, etc. to send a more personalized message. For example: Hi {{First_name}}, thanks for ordering {{item}}.
Liquid templates add more logic to dynamic content. For instance, if a users subscription tag contains free, you can send them a message: Grab your 10% discount.
Modifying the message content according to users IDs, behaviors, and preferences is the most efficient way to increase relevance and get more impressive results from your marketing campaigns.
Syntax
Anchor link toContent templates based on Liquid by Shopify use a combination of tags, objects, and filters to load dynamic content. Content templates allow you to access certain variables from within a template and output their data without having to know anything about the data itself.
To learn more about the syntax, please refer to Liquid documentation.
Objects
Anchor link toobjects define the content that will be displayed to a user. objects should be enclosed in double curly braces: {{ }}
For example, when personalizing a message, send {{Name}} in its body to add the users names to the messages content. The users name (Name tag value) will replace the Liquid object in a message the user will see.
Hi {{Name}}! We're glad you're back!Hi Anna! Were glad youre back!
Tags
Anchor link totags create the logic and control flow for templates. The curly brace percentage delimiters {% and %} and the text that they surround do not produce any visible output when the template is rendered. This lets you assign variables and create conditions or loops without showing any of the Liquid logic to a user.
For example, using the if tag, you can vary the messages language based on what language is set on users device:
{% if Language == 'fr' %}Salut!{% else %}Hello!{% endif %}Salut!
Hello!
Tags operators
Anchor link to| Operator | Description |
|---|---|
== | equals |
!= | does not equal |
> | greater than |
< | less than |
>= | greater than or equal to |
<= | less than or equal to |
or | logical or |
and | logical and |
contains | checks for the presence of a substring inside a string or array of strings |
In tags with more than one and or or operator, operators are checked in order from right to left. You cannot change the order of operations using parentheses parentheses are invalid characters in Liquid and will prevent your tags from working.
Filters
Anchor link tofilters modify the output of a Liquid object or variable. They are used within double curly braces {{ }} and variable assignment, and are separated by a pipe character |. Multiple filters can be used on one output, and are applied from left to right.
{{ Name | capitalize | prepend:"Hello " }}Hello Anna
Liquid templates usage
Anchor link toLiquid templates are available for both messages sent from Control Panel and API requests.
In Pushwoosh, Liquid templates are applicable to all content fields of any channel message:
- Push notifications
- Emails
To add a Liquid Template to your message, insert it into the messages body. You can do it when working with push or email elements, directly from the Customer Journey Builder interface.
Go to Customer Journey Builder > Create Campaign > drag and drop the following elements to your canvas: Audience-based Entry, Push (or Email), and Exit. Connect the elements. Then click the Push icon, choose Custom content, and insert your copy.
To add Liquid logic, use tag values with the following syntax:
{% if TagName == 'value' %} Content to send in this scenario{% else %} Content to send otherwise{% endif %}Then click Apply.
Template variables (Pushwoosh Tags) should not contain any spaces and have only alphanumeric values and underscores, e.g., my_tag or myTag instead of My Tag.
Learn more about Liquid templates in journeys
You can also use Liquid syntax in /createMessage requests to implement Liquid templates. For this, youll need assistance from your development team. Share the Liquid templates guide with them for detailed guidance.
Connected content
Anchor link toConnected content is a feature in Liquid templates that allows you to dynamically retrieve and use data from an external source, such as a web service, directly within your email or push notification messages. This feature enables real-time personalization by fetching JSON data from a specified URL and saving it to a variable that can be utilized in your content.
Key use cases
Anchor link to-
Product recommendations: Display personalized product lists tailored to each user.
-
Promo codes: Insert unique promo codes generated by a backend service.
Prerequisites
Anchor link to- To use Connected Content, you must have your own backend service that generates and provides the required data (e.g., promo codes, product recommendations) based on User ID, HWID, or custom tags. Pushwoosh then fetches this data before sending a message.
Step-by-step implementation guide
Anchor link toYoull need your developer teams help to use Connected content. Share this guide with them to get started.
Step 1. Set up backend service
Anchor link toThe backend service should:
- Accept a request containing user-specific parameters (e.g.,
userId). Connected Content supportsUserID,HWID, or any custom tags youve set up in your project. - Return a JSON response with the required data. This content can then be inserted dynamically into messages
The backend service acts as a data provider, responding to HTTP requests with user-specific information.
- Pushwoosh sends a request to your backend, passing user-specific identifiers as query parameters.
- Your backend processes the request and retrieves the requested data.
- Your backend returns a JSON response.
- Before sending a message, Pushwoosh fetches the JSON response from the backend service and uses the returned values (e.g., the
code) in the message content dynamically.
Example response
{ "code": "SPECIALOFFERFORUSER12345" }Step 2. Create a preset with onnected content in Pushwoosh
Anchor link to- In the Push or Email content editor, insert the Connected Content syntax into the message field.
Example
{% connected_content http://your-backend-url.com?userId={{ ${userid} }} :save result %}Syntax breakdown
connected_content | Fetches JSON data from the specified backend URL. |
http://your-backend-url.com | The backend endpoint that returns required data in JSON format. |
userId={{ ${userid} }} | A dynamic query parameter that passes the user ID to the backend. |
:save result | Stores the fetched JSON response in the result variable for use in Liquid templates |
 [Insert the Connected Content syntax]
![[Insert the Connected Content syntax]](https://docs.pushwoosh.com/connectedcontent.webp)
Authentication (optional)
If your backend service requires authentication, you can include an API key or token in the Connected Content request to ensure secure access.
{% connected_content http://your-backend-url.com?userId={{ ${userid} }}&auth=YOUR_API_KEY :save result %}You can also send authentication (or any other) data as HTTP headers using the optional :headers parameter a JSON object of header names and values.
{% connected_content http://your-backend-url.com?userId={{ ${userid} }} :headers {"Authorization": "Bearer YOUR_TOKEN", "X-Api-Key": "YOUR_API_KEY"} :save result %}:headers {...} | A JSON object of HTTP headers sent with the request, e.g. Authorization: Bearer <token>. |
${} personalization variables work only inside the URL. Values inside :headers are static and are not interpolated.
Prefer :headers over a URL query parameter (e.g. &auth=YOUR_API_KEY) for API keys and tokens: if the fetch fails, the request URL is written to logs, exposing a key placed there. Values inside :headers are never logged.
Connected content also requires Liquid content templates to be enabled for your account. If they arent, the whole connected_content tag including any key inside it is sent to every recipient as literal text instead of being rendered. Contact Pushwoosh Support if youre unsure whether your account has this enabled.
Using tags in Connected content
To include custom tags, insert them as query parameters in the Connected Content request ({{ tag_name }}).
{% connected_content http://your-backend-url.com?userId={{ ${userid} }}{{ Language }} :save result %}- Next, add the message text incorporating the retrieved data, like this:
Hey, {{userid}}, grab your personal promo code - {{result.code}}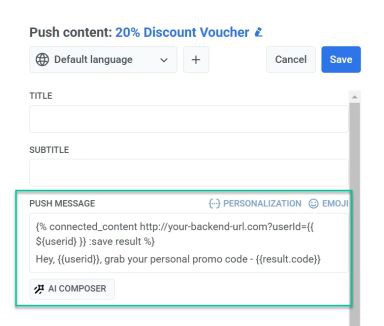 [Add the message text with the retrieved data]
![[Add the message text with the retrieved data]](https://docs.pushwoosh.com/connectedcontent-1.webp)
- After finalizing the message content and configuring the preset settings, save it for reuse in campaigns.
Step 3. Send a message using the configured preset
Anchor link toSend a message with this preset using the one-time push or email form or customer journey.
If the service returns a status other than HTTP 200 OK, the email or push notification will not be sent. This ensures that your communication only goes out if the necessary data is successfully retrieved.